
Easy Wet Felting Project for Beginners
If you’ve been itching to try wet felting but don’t want to start with slippers or handbags, these playful felted bowls made over balloons are a perfect beginner project. They’re fun, colorful, and oh-so-satisfying to make. Plus, they use up all those wool and yarn scraps you’ve been hoarding “for something special.” (Yes, I see you.)
What I love most about this project is how forgiving it is — every bowl turns out different, with its own texture and story. You can make them big or small, soft or firm, minimalist or gloriously chaotic. Think of them as functional art for your home or craft studio.
Materials You’ll Need
- Wool roving or feltable fibers (merino, corriedale, etc.)
- Scraps of yarn, threads, or bits of fiber for decoration
- Balloons (one per bowl)
- Warm water and mild dish soap
- Towels or a plastic sheet to protect your work area
- Scissors
- Optional: a bit of mesh fabric or netting to help hold fibers in place
Step-by-Step Instructions
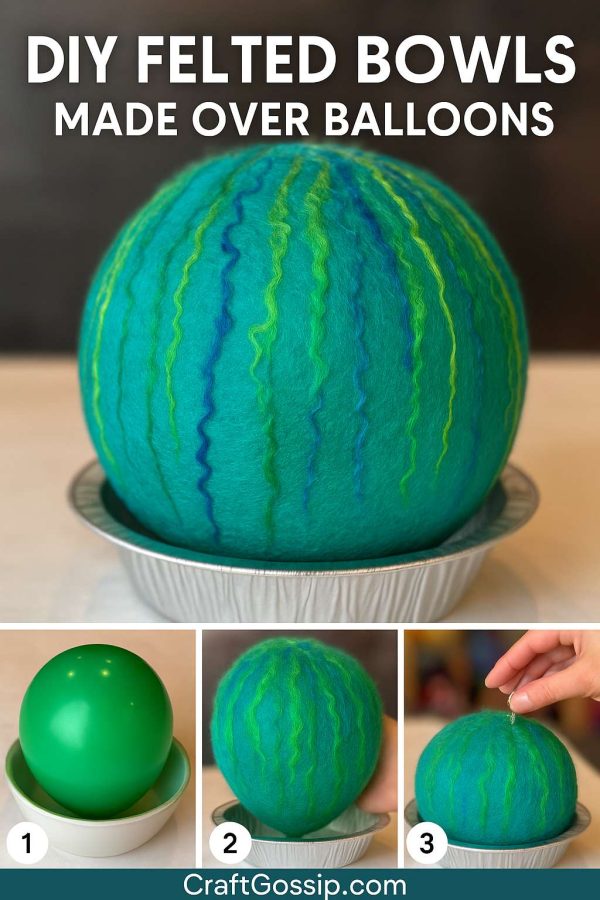
- Inflate Your Balloon
Blow up your balloon to the size you want your bowl to be. A smaller balloon will give you a petite trinket dish, while a larger one makes a great yarn bowl. Sit it in a small bowl or cup to keep it from rolling away. - Build Your Wool Layers
Pull small tufts of wool roving and start laying them across the top half of the balloon. Alternate the direction of each layer — horizontal, vertical, diagonal — so the fibers tangle well. You’ll want at least 4–5 layers for strength.
Add bits of yarn, thread, or curly fibers between the layers for texture and color. This is where the magic happens — it’ll all blend beautifully as it felts.
- Wet and Soap It Up
Mix warm water with a few drops of dish soap, then drizzle it gently over your fibers until damp. Lightly press down so the fibers cling to the balloon. Be gentle — it’s easy to shift things around early on. - Start Felting
Using your hands (or cover with mesh if needed), begin gently rubbing the wool in small circles. Rotate the balloon as you go, rewetting with soapy water when it starts to dry. After about 10–15 minutes, you’ll feel the surface begin to firm up.
The fibers are now locking together — it’s officially turning into felt!
- Rinse and Shape
Once your bowl feels sturdy, rinse off the soap with alternating warm and cool water. Gently press out the excess water with a towel and reshape the wool neatly on the balloon. Leave it to dry completely overnight. - Pop and Reveal
In the morning, pop the balloon and remove it. Voilà — a felted bowl! Trim any stray fibers or uneven edges with scissors if you’d like.
Variations and Ideas
- Make a nesting set by using different balloon sizes.
- Try felting with striped or blended roving for a marbled look.
- Add bits of lace or silk between layers for a delicate texture.
- Once dry, you can stiffen the bowl further with diluted PVA glue or fabric stiffener if you prefer a more structured finish.
Why You’ll Love This Project
This is the kind of craft that pulls you right into the creative flow — simple, tactile, and endlessly customizable. Whether you’re teaching a beginner felting class, making gifts, or just having a mindful afternoon with soap and wool, these bowls are guaranteed to make you smile.
Each one feels alive with color and texture — a little piece of your creative spirit turned into something both beautiful and useful.
Trending Products