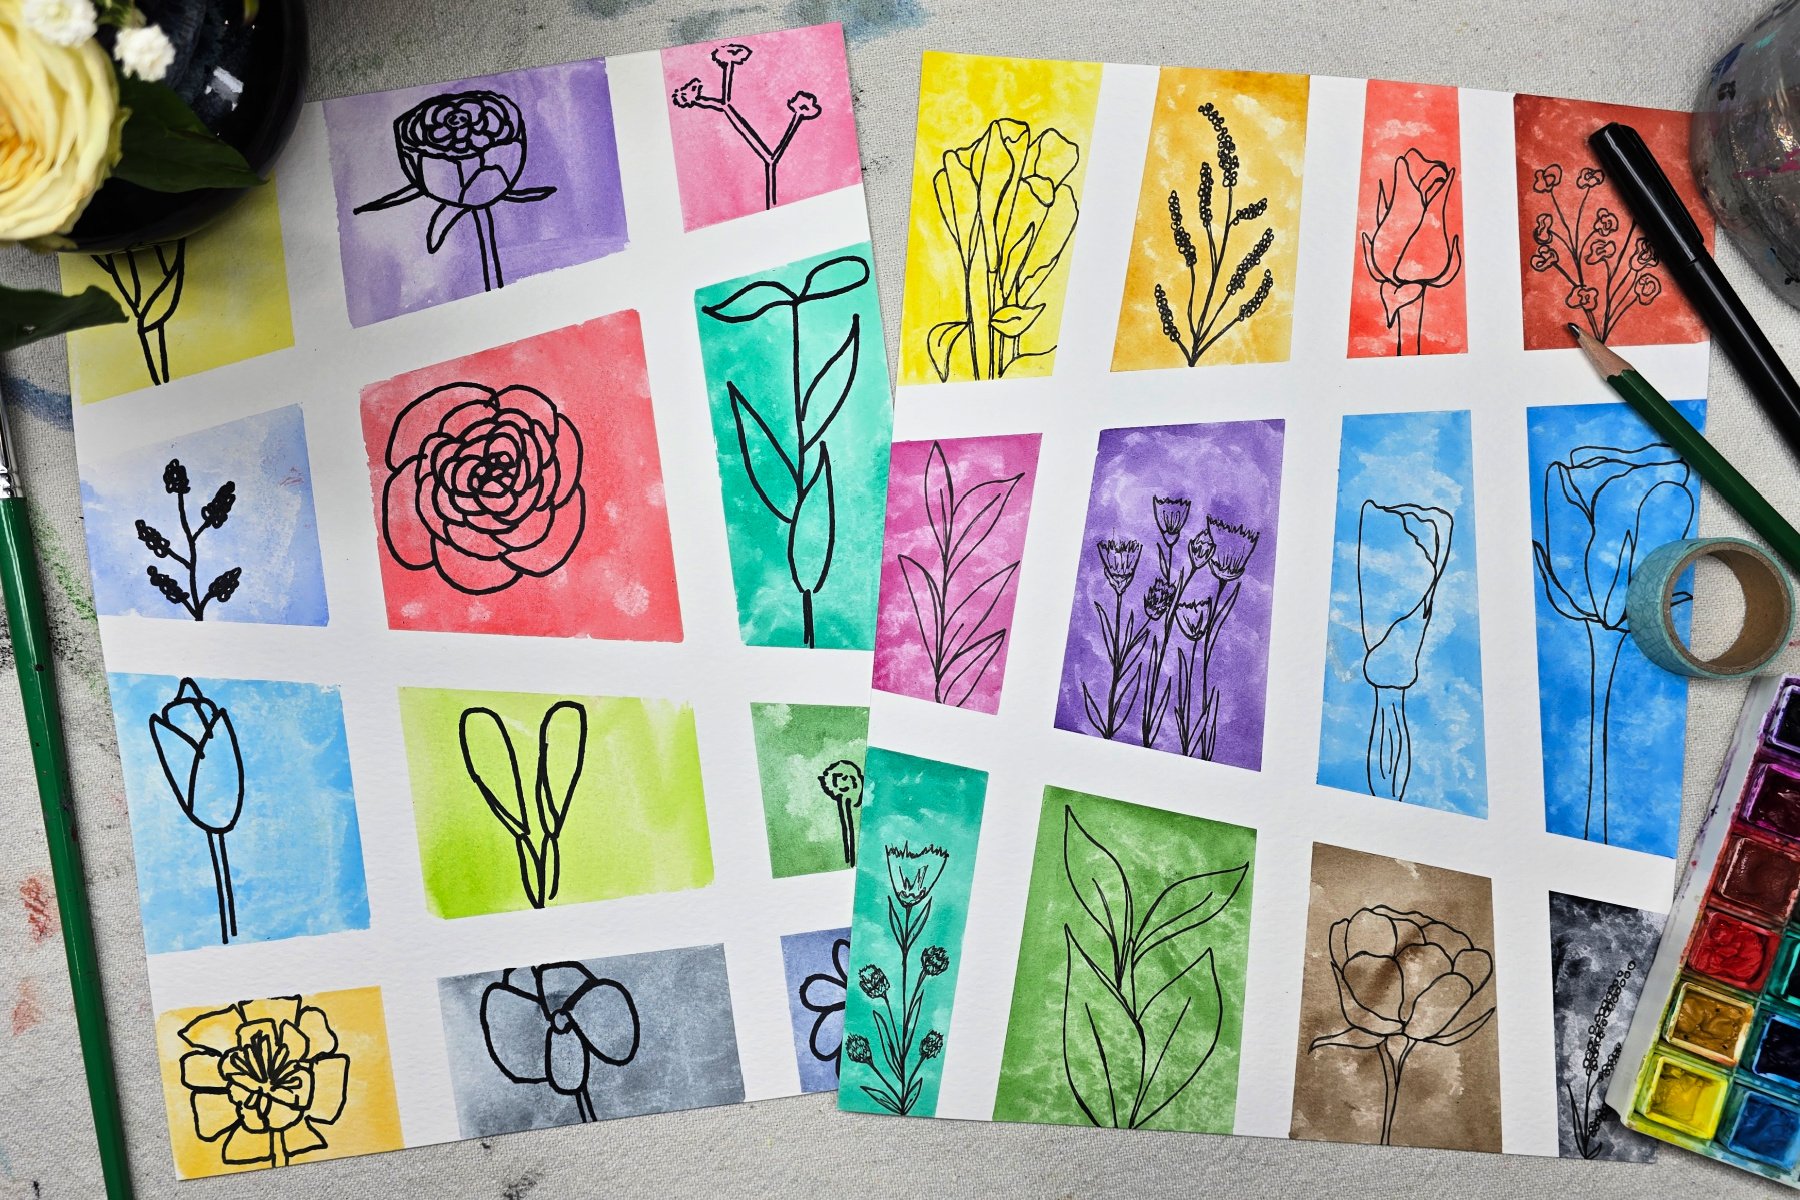
School-aged kids will draw small images of flowers from a bouquet in this fun project. Our basic techniques can easily be used at home or in the classroom.

Drawing from a Bouquet
Buying a bouquet from a local florist is an excellent way to study flowers that you may not readily have access to otherwise. This project gives kids a chance to take apart the bouquet and really focus on the unique shape and design of each individual flower.
Related: Pair a fun Watercolor Technique with this project!
Supplies Needed For This Drawing From a Bouquet Art Project

- Flower Bouquet Featuring Various Flowers
- Watercolor Paper
- Washi Tape
- Pencil
- Fine-Tip Permanent Marker
- Watercolor Paints
- Paintbrushes
- Water
- Paper Towels
Directions to Make Our Drawing From A Bouquet Project
Step 1

First, use washi tape to create a grid on the watercolor paper. You choose the number, size, and shapes of the grid segments.
Tip: Ensure washi tape edges are fully pressed onto the paper. This will prevent paint from seeping underneath in future steps.
Step 2

Next, lightly sketch each flower into the various sections of your grid. Remove flowers from bouquet to better focus on each flower individually. If you have more grid spaces than flowers, repeat drawing some of the flowers from a different angle or viewpoint.
Step 3

Then, use a fine tip permanent marker to trace over sketches. Erase unwanted pencil lines.
Step 4

Next, use watercolors to fully paint each section on your grid. While the watercolor paints are still wet, we dabbed the paint with a dry paper towel to create an interesting color effect.
Step 5

Optional: Once the paint is dry, trace over designs with fine tip permanent marker to create bold lines.
Step 6

Finally, carefully remove washi tape from dry completed project.
Finished Drawing from a Bouquet Art Project

I love the crisp lines that the washi tape leaves against our bright colors! Since these projects are made on paper, they can easily be framed, clipped, or displayed in your preferred style.
Our Experience Making this Bouquet Art Project
Any time I have a flower bouquet in my presence, I am going to draw it. I love being able to study the flowers up close, especially when they are ones that I don’t have readily available in my yard. This project allows kids to take a moment and study each flower, while choosing how detailed or minimalistic of a drawing they want to create. It also opens the door to exploring new watercolor techniques and studying a color palette.
Prep Time
5 minutes
Active Time
30 minutes
Total Time
35 minutes
Difficulty
Medium
Estimated Cost
$1
Materials
- Flower Bouquet Featuring Various Flowers
- Watercolor Paper
Tools
- Washi Tape
- Pencil
- Fine-Tip Permanent Marker
- Watercolor Paints
- Paintbrushes
- Water
- Paper Towels
Instructions
- Use washi tape to create a grid on the watercolor paper. You choose the number, size, and shapes of the grid segments. Tip: Ensure washi tape edges are fully pressed onto the paper. This will prevent paint from seeping underneath in future steps.
- Lightly sketch each flower into the various sections of your grid. Remove flowers from bouquet to better focus on each flower individually. If you have more grid spaces than flowers, repeat drawing some of the flowers from a different angle or viewpoint.
- Use a fine tip permanent marker to trace over sketches. Erase unwanted pencil lines.
- Use watercolors to fully paint each section on your grid. While the watercolor paints are still wet, we dabbed the paint with a dry paper towel to create an interesting color effect.
- Optional: Once the paint is dry, trace over designs with fine tip permanent marker to create bold lines.
- Carefully remove washi tape from dry completed project.
Notes
Bouquet Flower Study Art Variations
- Go on a nature walk to collect flowers, leaves, or other items for this project.
- Once the washi tape is removed, use a permanent marker to fill the empty spaces with lines or patterns.
- Adjust colors and items to fit any season or holiday.
Bouquet Art Project Variations
- Go on a nature walk to collect flowers, leaves, or other items for this project.
- Once the washi tape is removed, use the permanent marker to fill empty spaces with lines or patterns.
- Adjust colors and items to fit any season or holiday.
Other Fun Nature Art Projects from Kids Activities Blog
Did your kids enjoy drawing individual flowers from a bouquet? Were they able to identify any of the flowers they drew?
Trending Products
