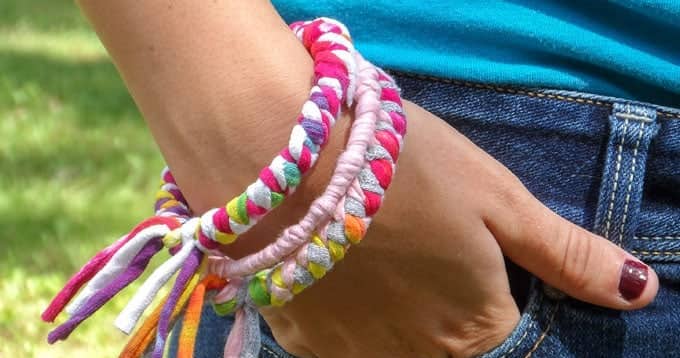

These colorful t-shirt bracelets are an easy to make recycled craft project and are perfect for teenagers or preteens! All you need are inexpensive bangle bracelets and some old t-shirts to make these pretty fashion statements.

Recycled T-Shirt Bracelets
These colorful t-shirt bracelets are made from recycled clothing. This project is a great way to re-use stained or old clothes that are taking up space in your closet.
If you have a teenager or preteen, this is a fun wearable craft to do with them. They’ll probably want to make some for their friends too and would make the perfect homemade gift! They also make a fun girl scout craft or camp craft in which you can teach the importance of reusing and recycling during the process of making them.

Because the braided material will make the opening of the bangle smaller, it’s important to get bracelets that are big enough to allow room for your wrist to get through the finished bracelet.

For example, due to my plus size frame, my wrists are considerably larger than my daughter’s. Therefore, the bracelets fit her great while I was unable to get them on.

Cut t-shirt material into strips, braid them together, and wrap them around a metal bangle. Secure with hot glue!
FIND THE FULL PRINTABLE VERSION BELOW!
What you’ll need to make recycled t-shirt bracelets

Fun, right? I hope you enjoy making these colorful t-shirt bracelets. Use the rest of your leftover t-shirt scraps to make the headband version- Recycled T-shirt Headbands!
More Bracelet Making Ideas
Make Bracelets from Recycled T-shirts
Use bangle bracelets and strips of t-shirt material to make this beautiful wearable craft!
Supplies
- T-shirts
- Bangle bracelets
- White craft glue
- Scissors
- Hot glue gun
Instructions
-
First, you’ll want to cut your t-shirt material into strips. My strips were about 16 inches long and approximately 1 inch wide. The material will stretch as well, making them considerably longer.
-
To create a simple single colored bangle, first, stretch the material out, tie the t-shirt strip in a loose knot around the bracelet.
-
Wrap the material tightly around the bangle. If you run out of material before you get to the end, simply hot glue another strip to the end of your current strip and continue.
-
When you arch the end, untie the first knot and tie the two loose ends together. Tie them tight and position the knot on the inside of the bangle, cut the ends and secure with some white craft glue.
-
To make braided bracelets, gather SIX strips of material, 2 of each color you wish to use. It’s best to choose contrasting colors. I used four tie-dyed strips and two white strips for one bracelet, and for the other I used two each gray, tie-dye, and pink.
-
Use a hot glue gun to attach two matching strips, end to end to make one long strip. Repeat for the others. Stretch out the material, taking care not to pull them apart where they are glued. Tie the three strips together in a loop knot, leaving a couple of inches above the knot.
-
Braid the strips together. When you get to the end, wrap in a rubber band or tie with some scrap fabric (only temporary). Wrap the braid tightly around the bangle. When you reach the end, loosen the knots on both ends and tie together. Secure the knot with white craft glue. Trim the fringed ends to a length that you like.
This post was originally published on this blog on Oct 28, 2012.
Trending Products