In this article, I describe the resist technique by referring to historic examples, from dyed fabrics to etchings, and Henry Moore’s drawings. Then I demonstrate how you can apply the resist technique to a host of mediums, such as acrylic, oil paint, and mixed media for drawings. Articles in the Techniques Series define the meaning and context of art making processes and give practical tutorials on how to work with them.

Resist Techniques for Painting, Drawing, and Printmaking
Definition: The resist technique refers to media or materials that have been used to block out or reject the subsequent layers that are applied to an artwork, to retain the quality of the ‘resisted’ area. For example, an oil pastel drawing will reject a layer of ink applied on top of it, adhering to the surrounding areas of paper, and tape applied over a dry area of oil painting will resist the next layer, so the original one can be revealed again later.
What is the Effect of the Resist Technique?
The resist technique has a different visual effect depending on the medium or combination of mediums it’s used with. In general, it indicates that the artist is a methodical worker, since it requires foresight to implement. When viewed closely, areas of artworks that have been created by resist techniques are often immediately easy to spot, since it’s clear that it’s the only way they could have been created. If the artist wants their work to feel spontaneous and immediate, this technique may be conceptually at odds. But if they would like the viewer to get a sense of their planning, preparation, and decisive image making, then the resist technique immediately conveys all of these.
When areas of an oil or acrylic painting are taped to retain their initial layers for later, the edges of these areas are often very sharp and crisp because of the taped edge, making it ideal for geometric, graphic, or architectural imagery. There may be a built-up physical ‘edge’ around the side of the tape, where the paint has been added thickly on top. This hard line could later be diffused by a brush if the tape is removed while the paint is still malleable. But often, the crisp edge is intended as an asset of the work. This gives paintings a sharp quality that is hard to replicate with any other method. Some artists may create very elaborate masked areas that they have cut with a knife to get away from the rigidity of the straight edge.

In watercolour or ink painting, masking fluid is used to block out areas of the paper that the artist wants to keep white. Since the fluid can be painted in any shape, it’s a more flexible technique. And is ideal for picking out tiny details that would be very difficult to retain through just painting around them, like tiny stars in a sky or the highlights in hair. This technique conveys the effect of preplanning and decisiveness, but it is also very easily changed or covered by rewetting the surrounding paint or covering it, since it won’t create a physical ridge like the previous example in oil or acrylic paint.

The resist technique in drawing often refers to works made with a wax, crayon, or oil pastel, which have later been washed over with a water-based media, like ink or watercolour. Since oil and water don’t mix, the oily drawn area will reject the water-based media, so only the surrounding paper will be coloured. This has the effect of a negative image, and feels more spontaneous than the other resist techniques because it’s mixed media. And it won’t have clean edges because of the inconsistent quality of line you can achieve with the oily drawing materials.
The resist technique is integral to etching processes, so it’s hard to conceptually consider it as an individual artistic choice. Perhaps it is more unusual to see etchings where no resist technique has been used, like a plate that has been created using hard or soft ground, with a unified duration of time in the acid across the whole plate.
The History of the Resist Technique
The history of the resist technique begins in fabric design production from early cultures across the world. There is evidence of the technique being used as early as 400 BC by the Egyptians, applying designs to mummy wrappings by covering them in wax and scratching the designs off, before dyeing them. Each dyeing practice involves applying a resistant material in patterns or shapes to resist the dye that the fabrics are dipped into.
Batik fabrics from Indonesia are incredibly complex examples of the resist technique, where the blocking of the design out with wax before the dyeing process is repeated many times in different colours to build up the entire design.
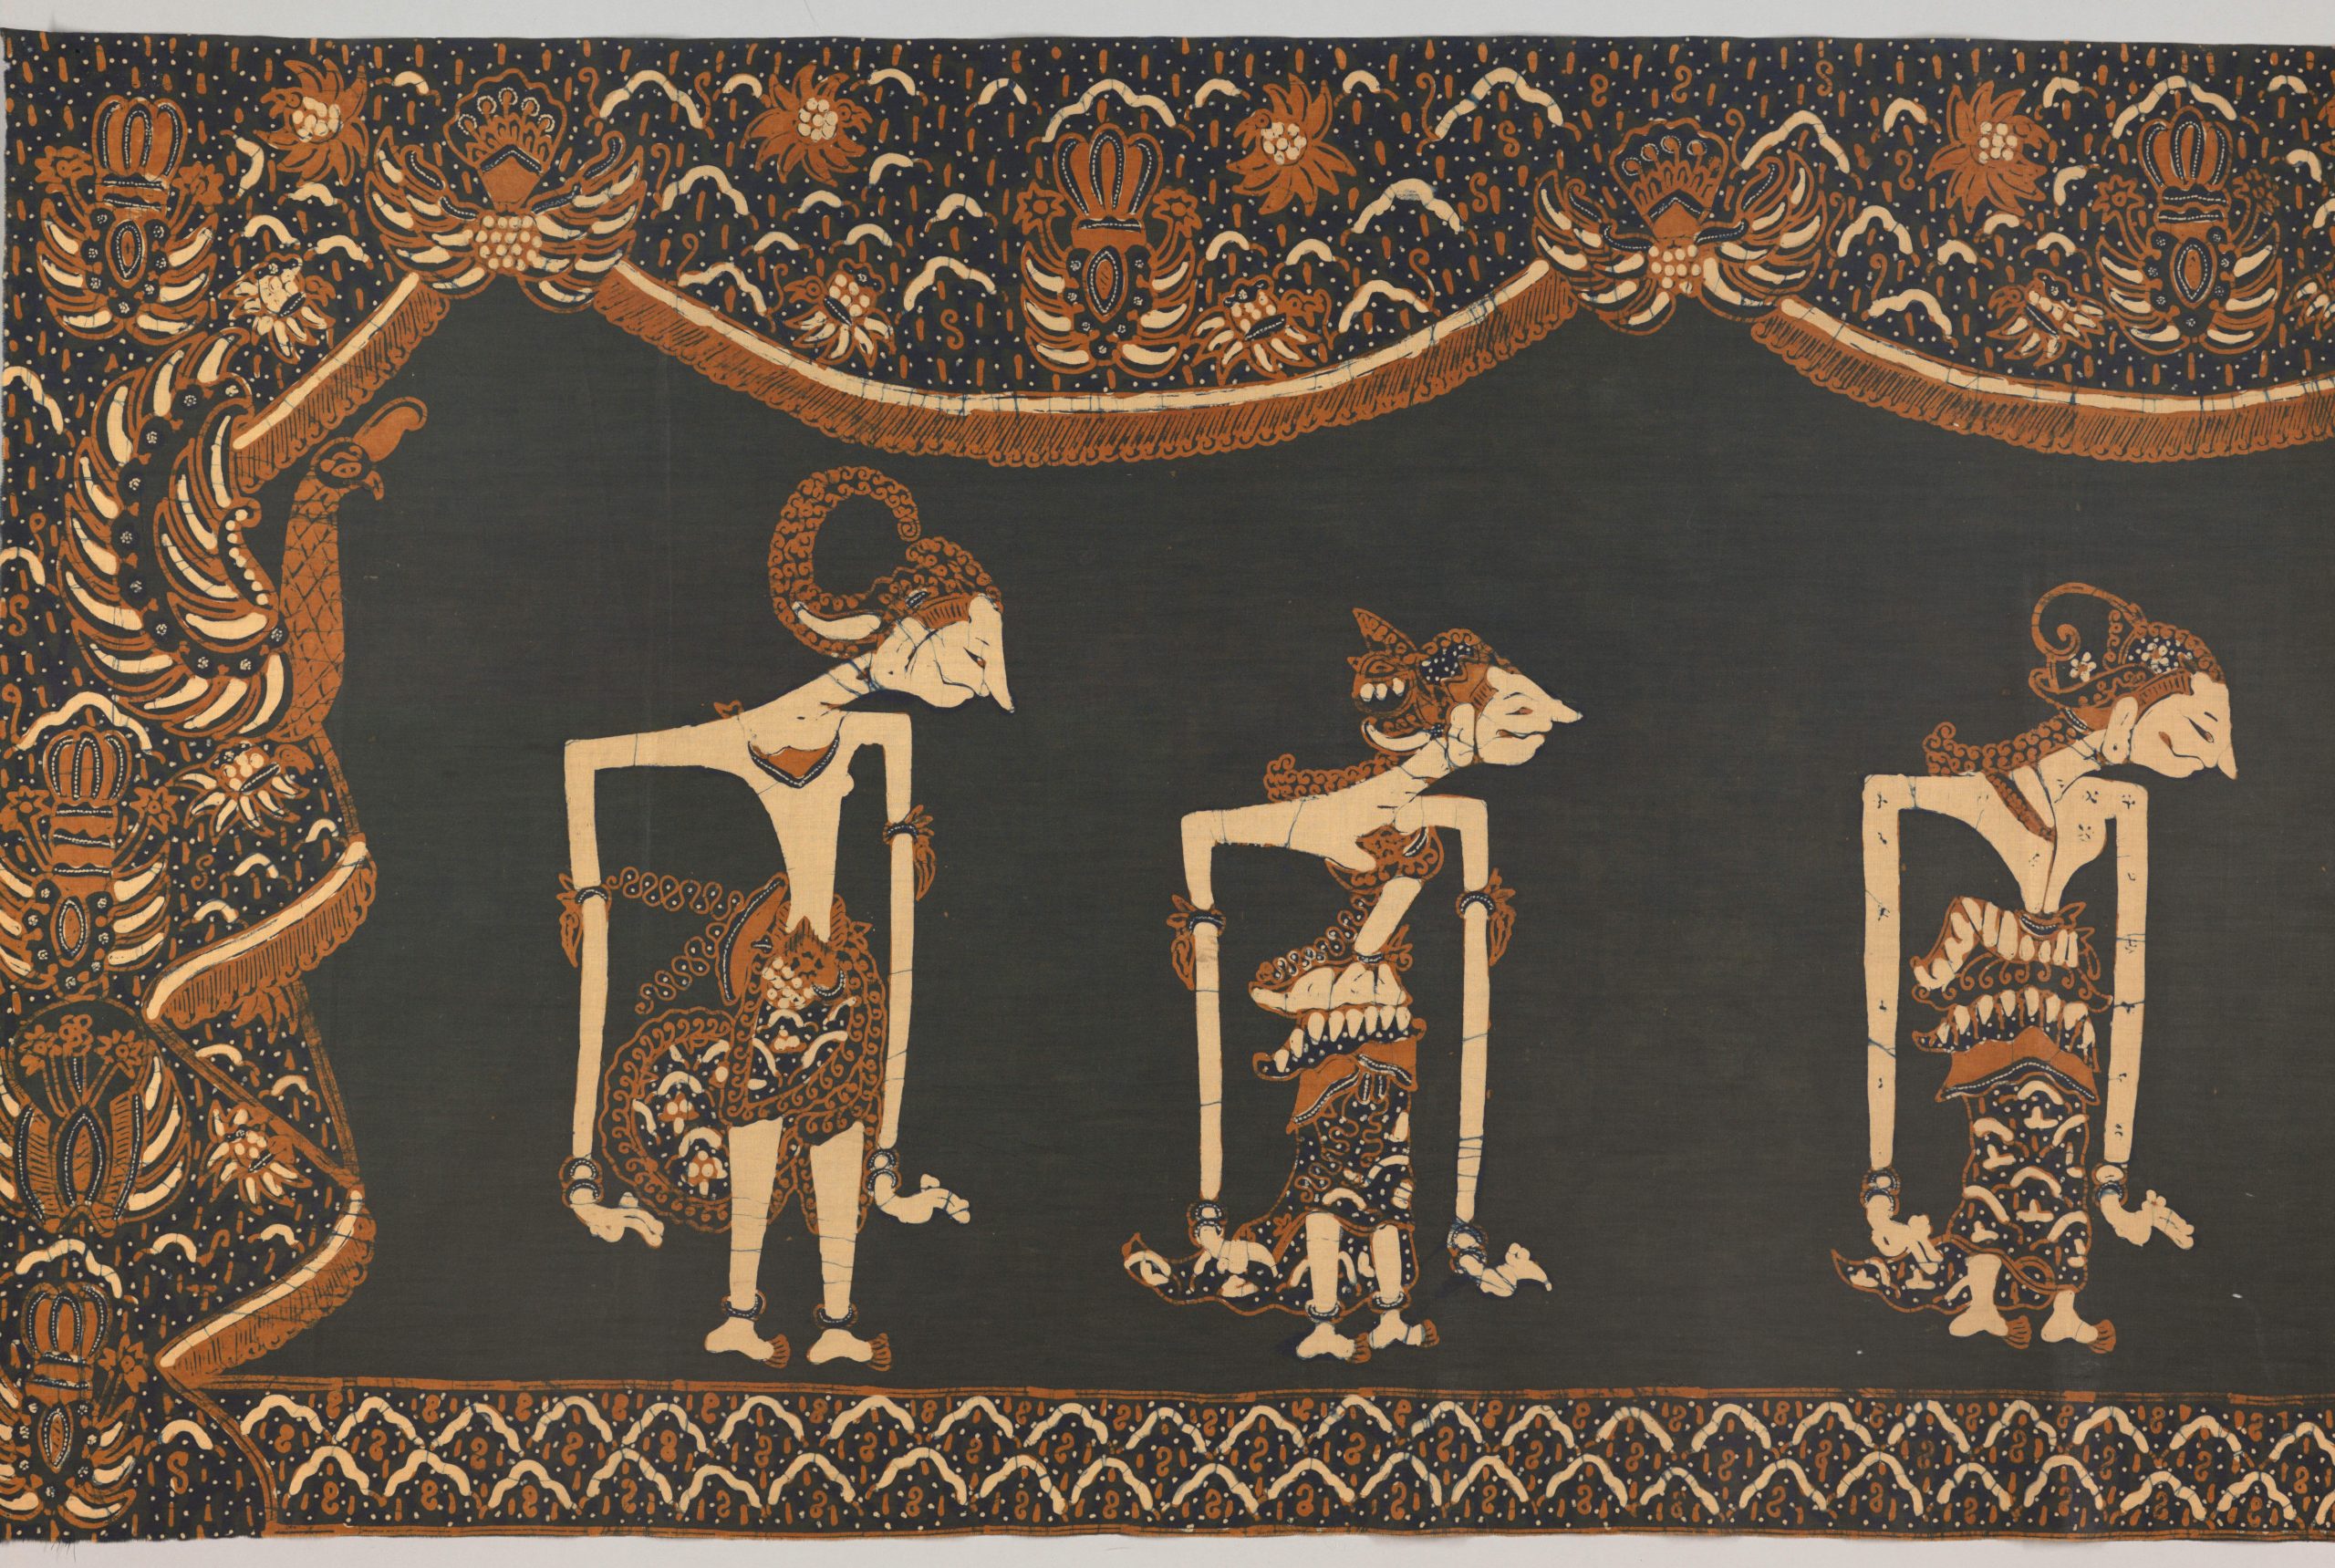
Panel of Wayang Puppets, 19th Century
Unknown artist, Indonesia
Wax resist dyeing (batik) on plain weave, 200 x 53.3 cm | 78.7 x 21 in
Smithsonian
In China, during the Sui and Tang dynasties (581-907 AD), beeswax was most commonly used to create intricate designs on fabric to resist the dye, known as làrǎn (蜡染). This tradition is still carried out today in Guizhou, Yunnan, and Guangxi.
Yoruba textile art, also known as Adire, from Nigeria, has been practiced since the 1800s to this day. A variety of different techniques are used to resist the dye to create different imagery, such as Oniko, which involves tying small circles of fabric around small objects like pebbles to create a circular pattern, and Eleko, which describes fabrics patterned by creating a resist technique with starch made from cassava flour, applied through a stencil or painted freehand.

Alokun, Date Unknown
Yoruba Artist, Nigeria
Adire eleko on cotton cloth, 190.82 x 173.04 cm | 75.2 x 68.2 in
Minneapolis Institute of Art
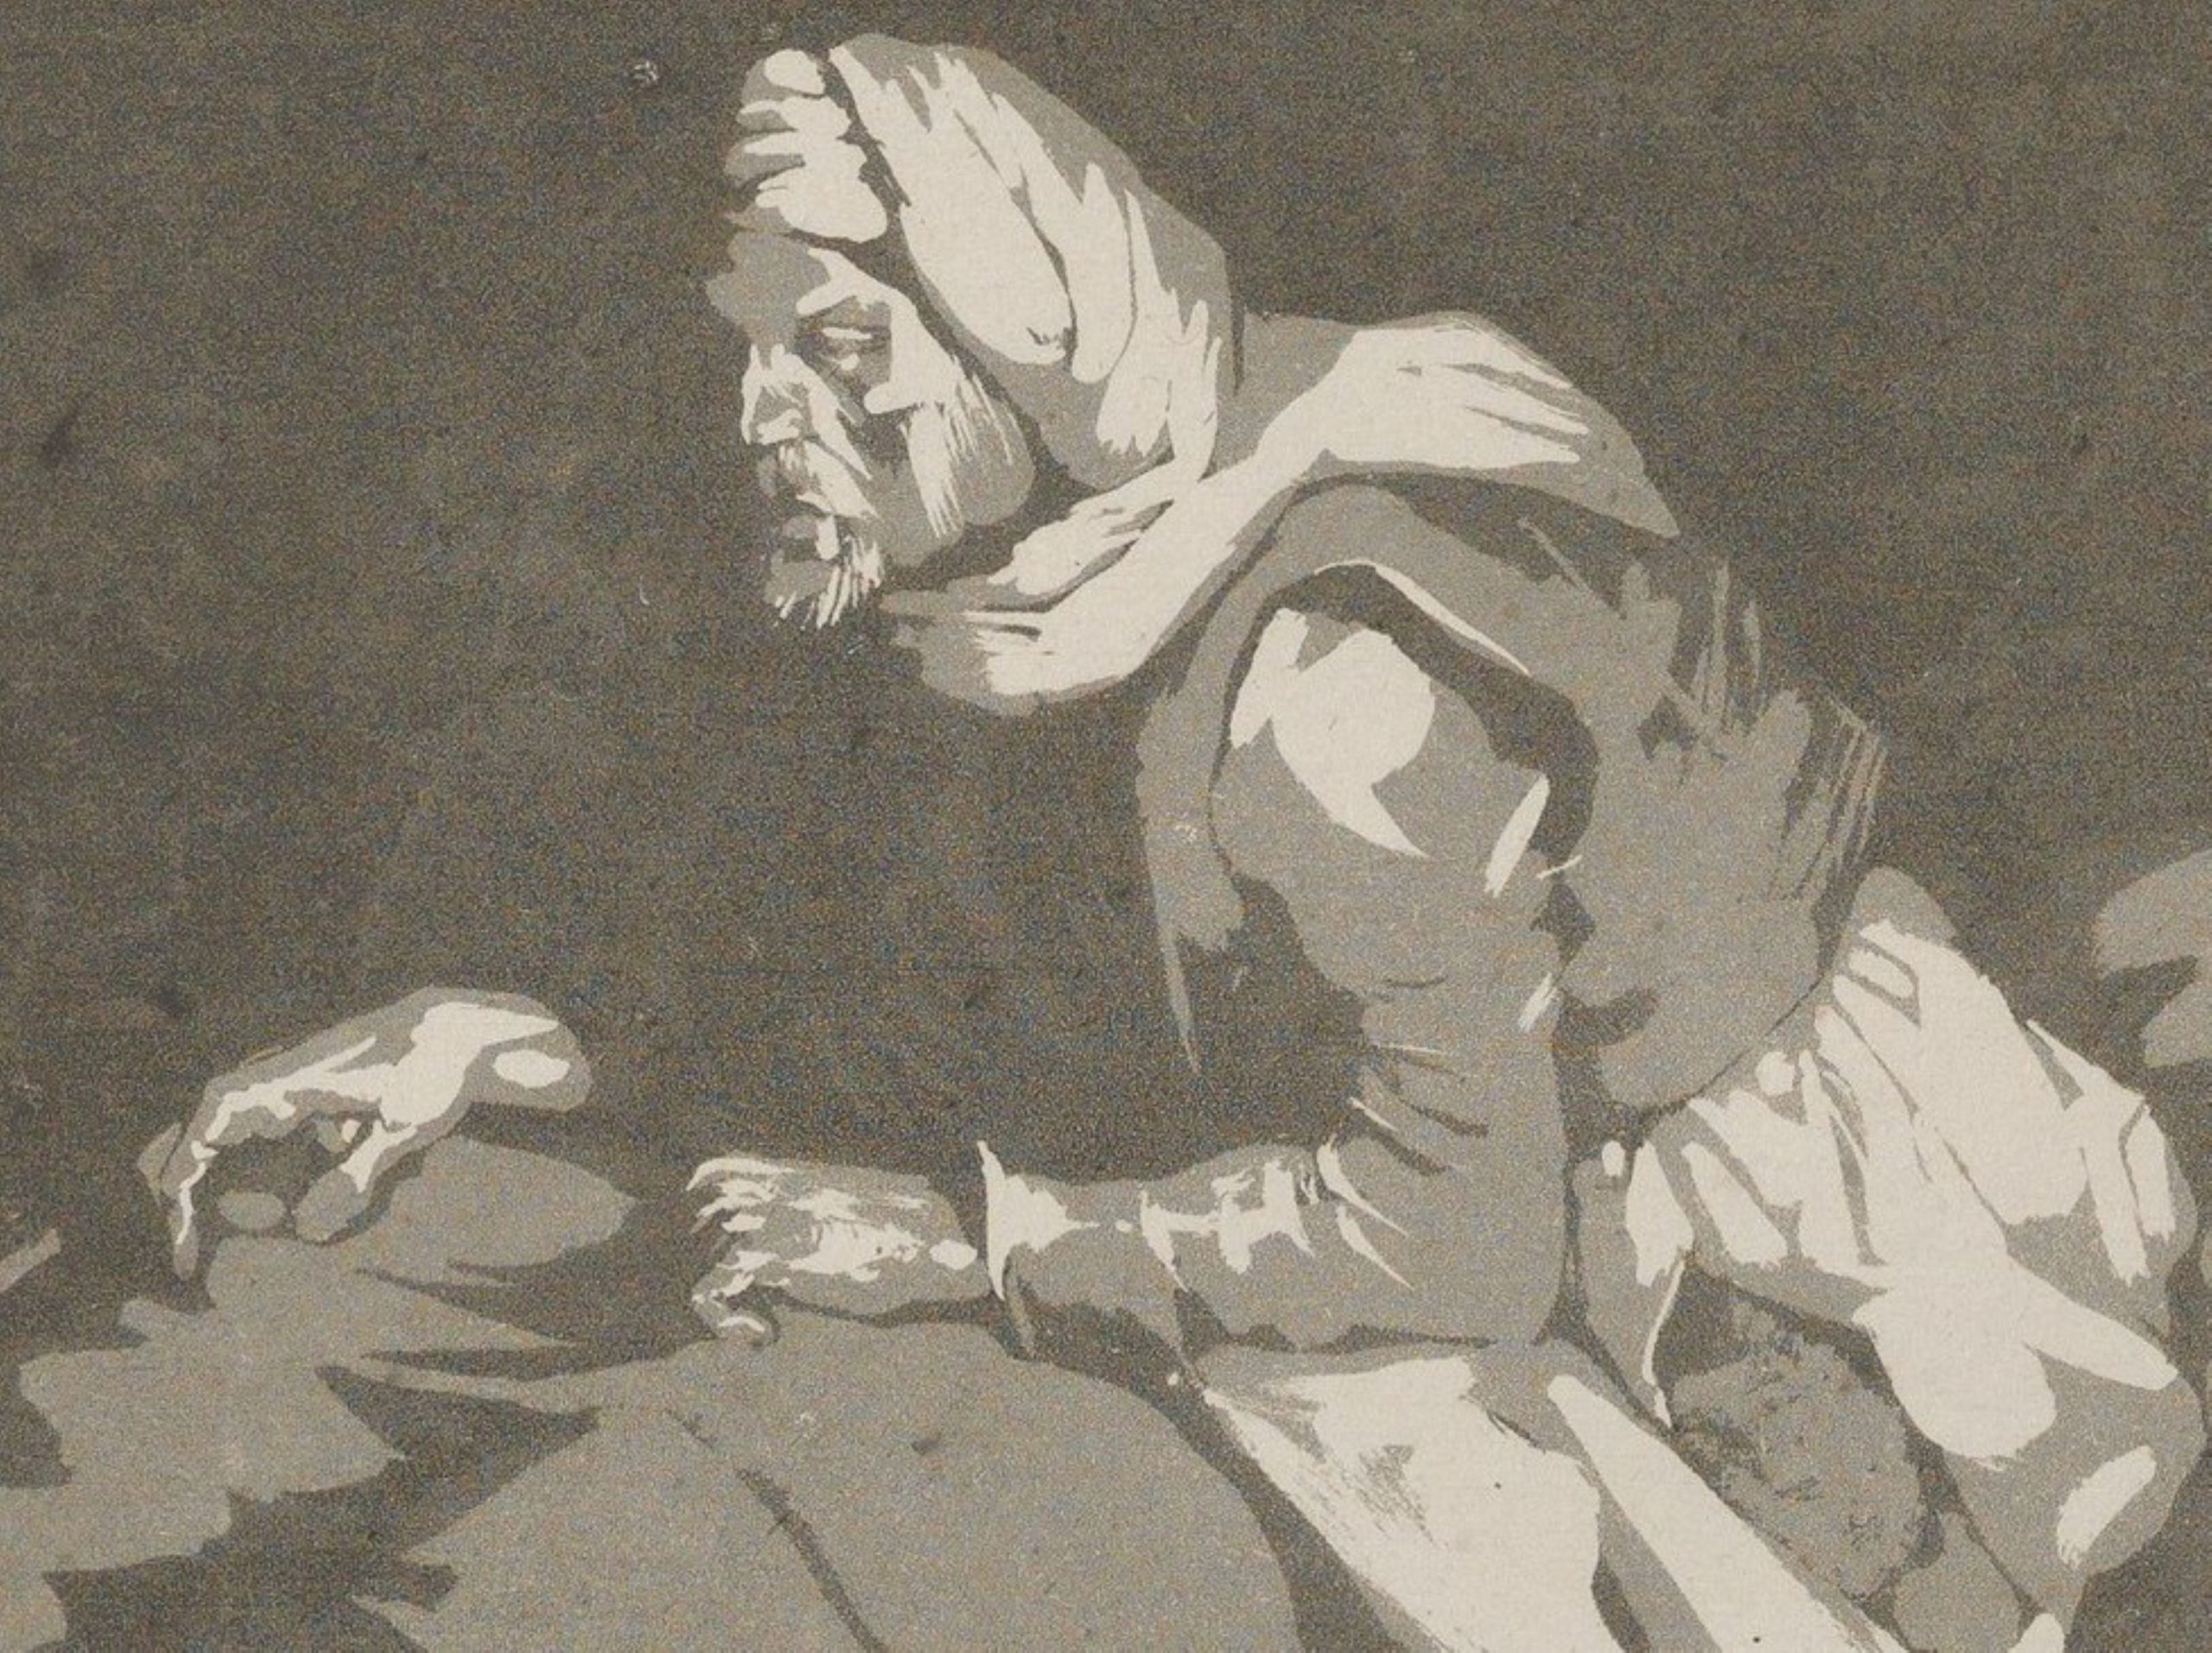
The resist technique in fine art is probably most well-known from Henry Moore’s drawings. He mastered the technique in the 1940s after the outbreak of World War II, when his home and studio in London were bombed. He took refuge amongst the population of the city in the London Underground tunnels being used as bomb shelters. He completed two sketchbooks of shelter drawings, some of which he developed into separate works later. Using the wax resist technique with light pastels (often white), he layered these drawings with watercolours, pencil and inks, to develop haunting sculptural figures.
By the 1930s, Moore was already a very successful sculptor, and without access to his studio in the Blitz era, the wax resist technique allowed him to create the kind of texture and form that he’d been used to carving out in stone. The drawings have incredible depth and weight, as seen in At the Coal Face. A Miner Pushing A Tub, where we see a miner during the war effort throwing his whole weight against a heavy metal cart, with others toiling in the background. The wax crayon he was using to resist his ink and watercolours can be seen in the eerie highlights of the drawing.

At the Coal Face. A Miner Pushing A Tub, 1942
Henry Moore
Crayon, ink, watercolour, gouache and chalk on paper, 32.3 x 65.2 cm | 12.7 x 25.7 in,
Imperial War Museum
Printmakers also utilise a couple of different resist techniques in etching to block or ‘stop out’ the acid from eating into areas of the plate that they want to keep lighter when it’s printed later. When using an aquatint, layers of varnish are successively applied to the plate to resist the acid and create a gradation of tone. In Interior of a Military Hospital by Delacroix, we see a really clear example of etching aquatint in two stages. First, he has applied varnish to all of the areas that are white on the print to protect them from the acid. He then etched the entire plate to create the grey midtone. If you printed the plate at this stage it would just be white and grey. Next, the plate is removed from the acid, and another layer of varnish is applied over all of the areas of the plate he wanted to keep as this grey midtone. The next dip in the acid etched all of the plate left out of the resist technique, to create the darkest tone.
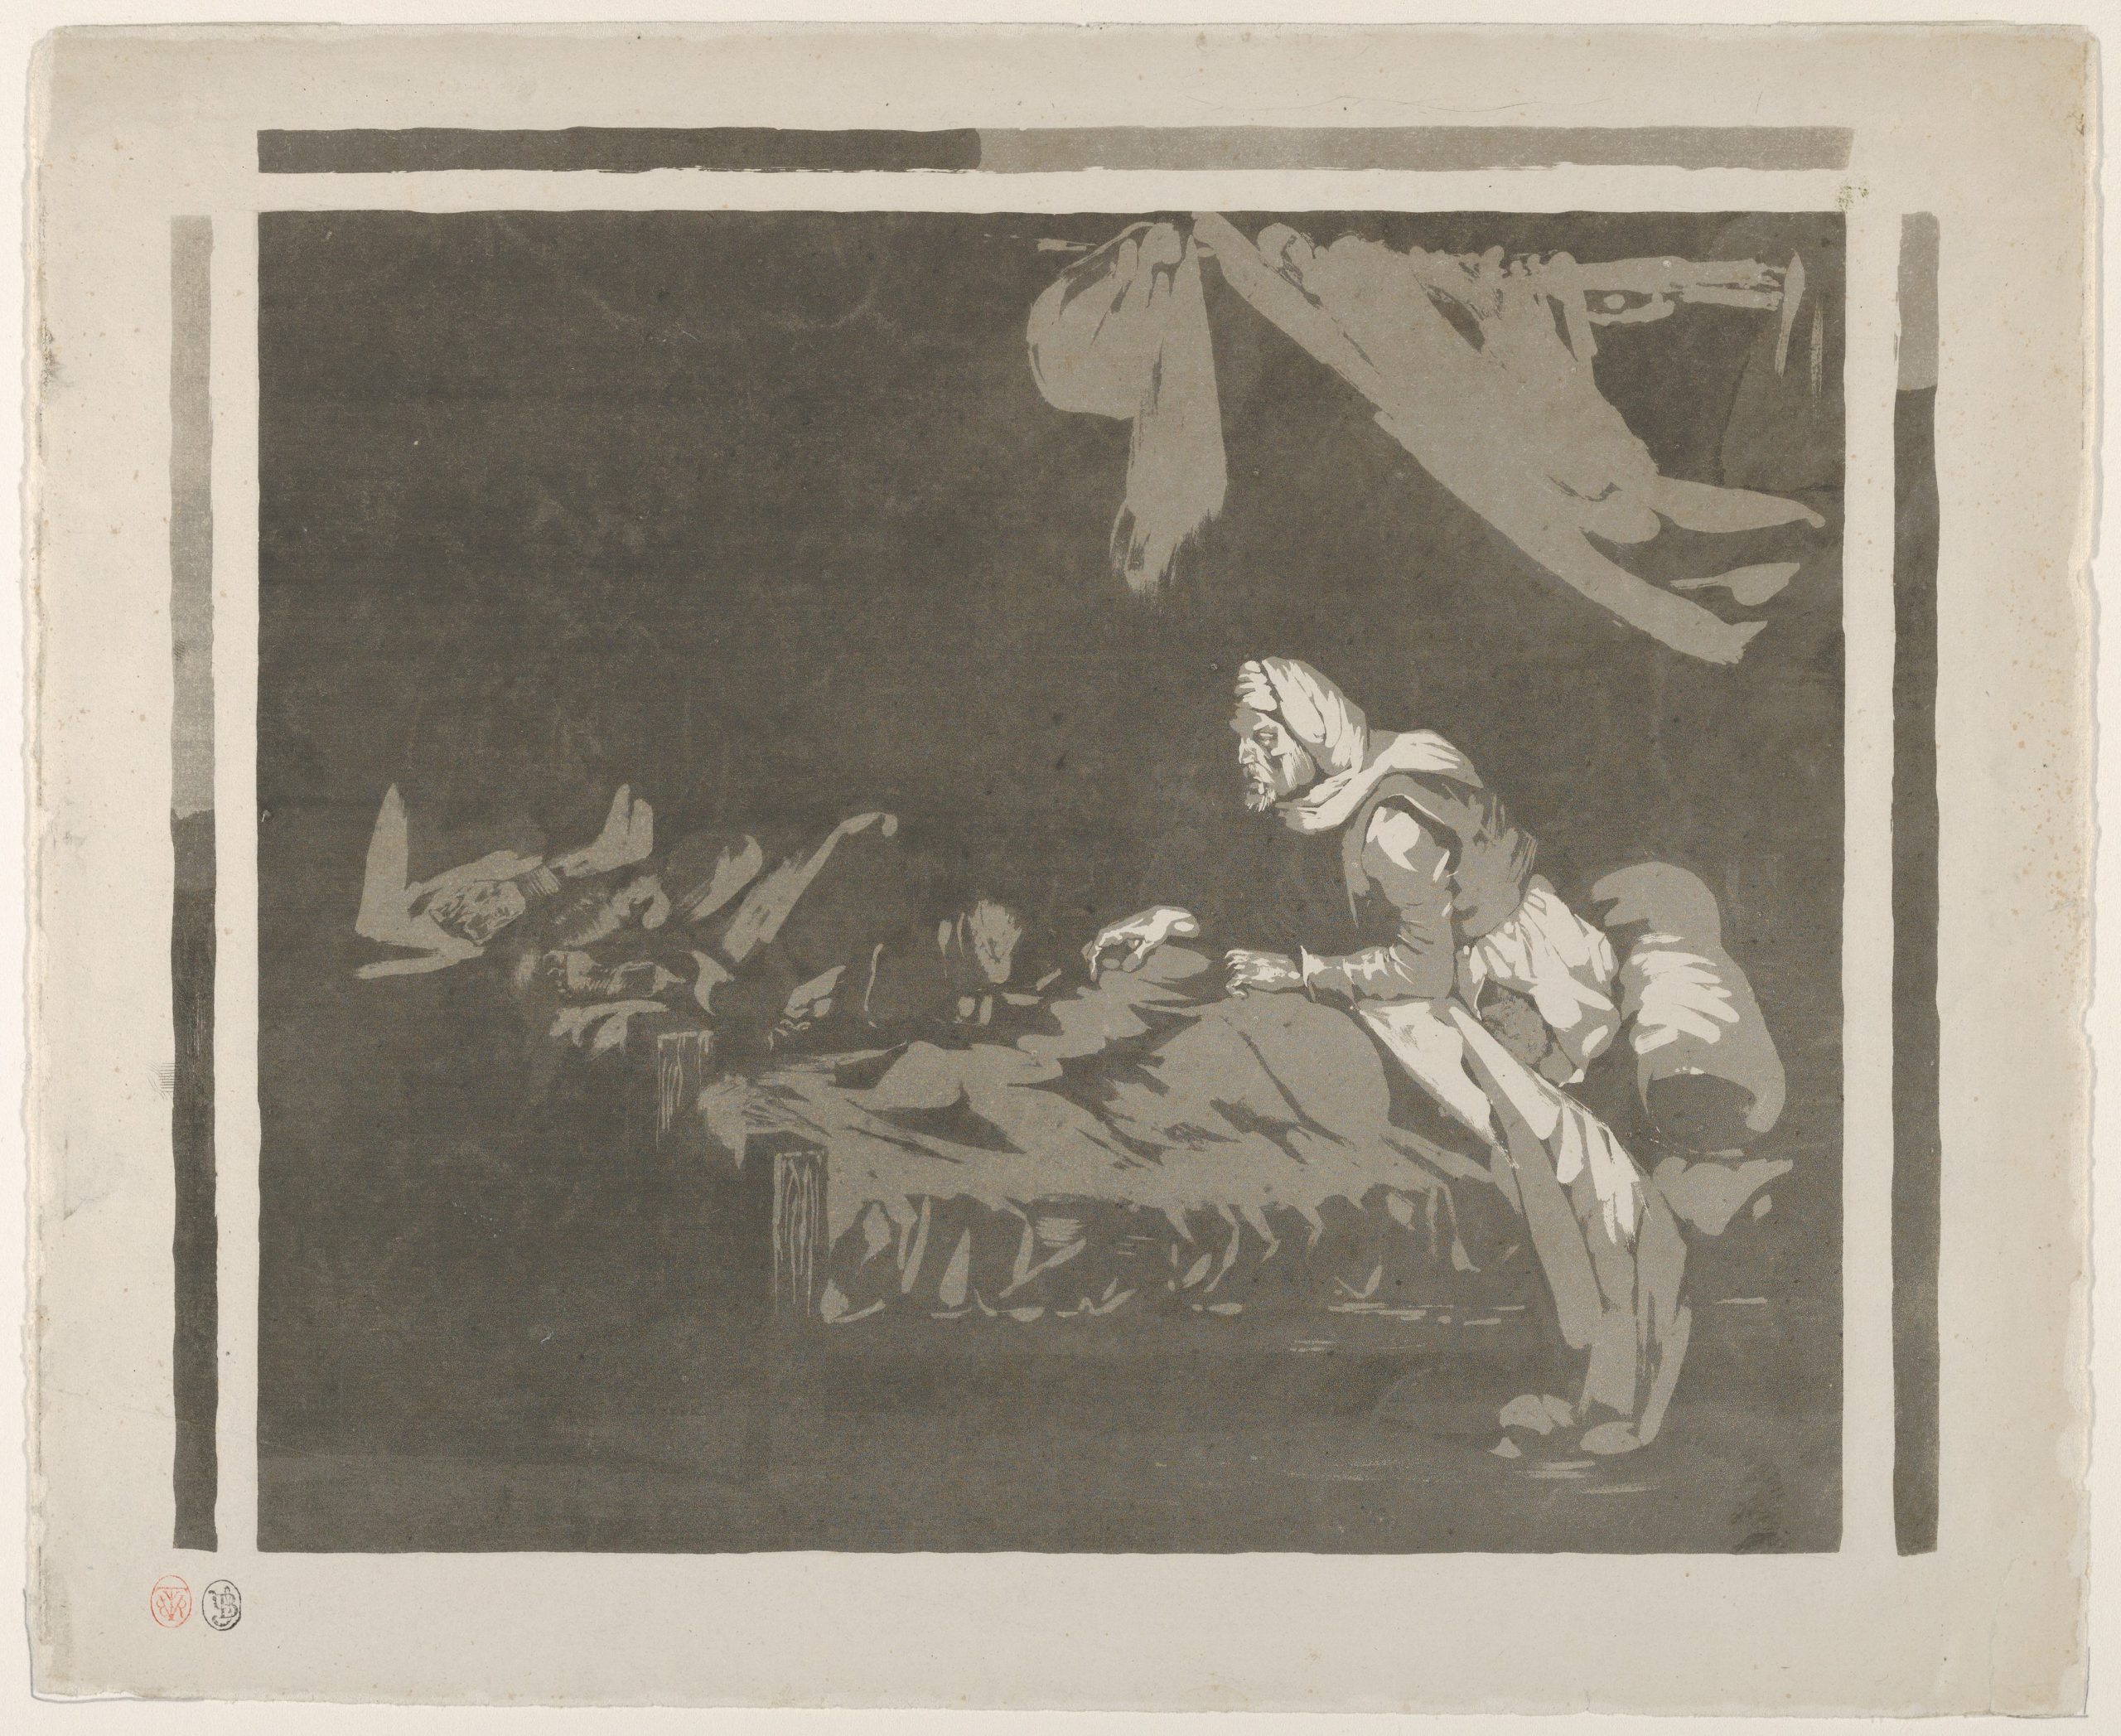
Interior of a Military Hospital, 1828
Eugéne Delacroix
Aquatint, 33.8 x 27.6 cm | 11.4 x 9.4 in
The Metropolitan Museum of Art
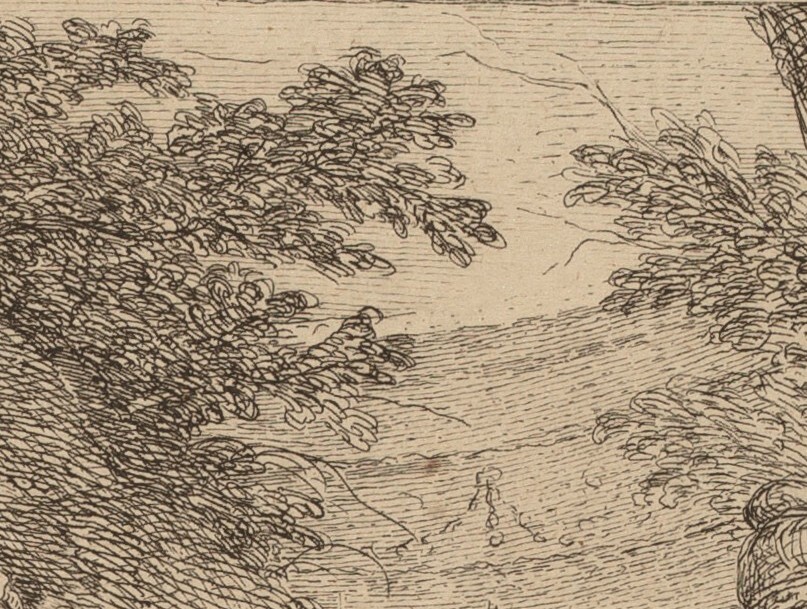
Even without an aquatint, areas of the plate can be preserved using a resist technique with varnish, such as sections of linework the artist wants to keep lighter. The areas not blocked out are etched further, creating darker, wider lines that hold more ink when printed. In this etching, Rinaldo and Armida, by Angelica Kauffman, we can see the variation of tones in lines that have been etched to different depths by using the resist technique. In the cropped detail, the leaves of the tree have been left in the acid for the longest time, with the hillside for a medium length of time, and the light lines in the sky for the shortest.

Rinaldo and Armida, 1762-70s
Angelica Kauffman
Etching, 39.1 x 28.8 cm | 15.4 x 11.3 in
National Gallery of Art
Using the resist technique with tape for painting in oil and acrylic, and with masking fluid for watercolours, are more contemporary practices invented in the 20th Century that I’ll demonstrate in the following examples.
Demonstration of the Resist Technique for Oil and Acrylic Painting
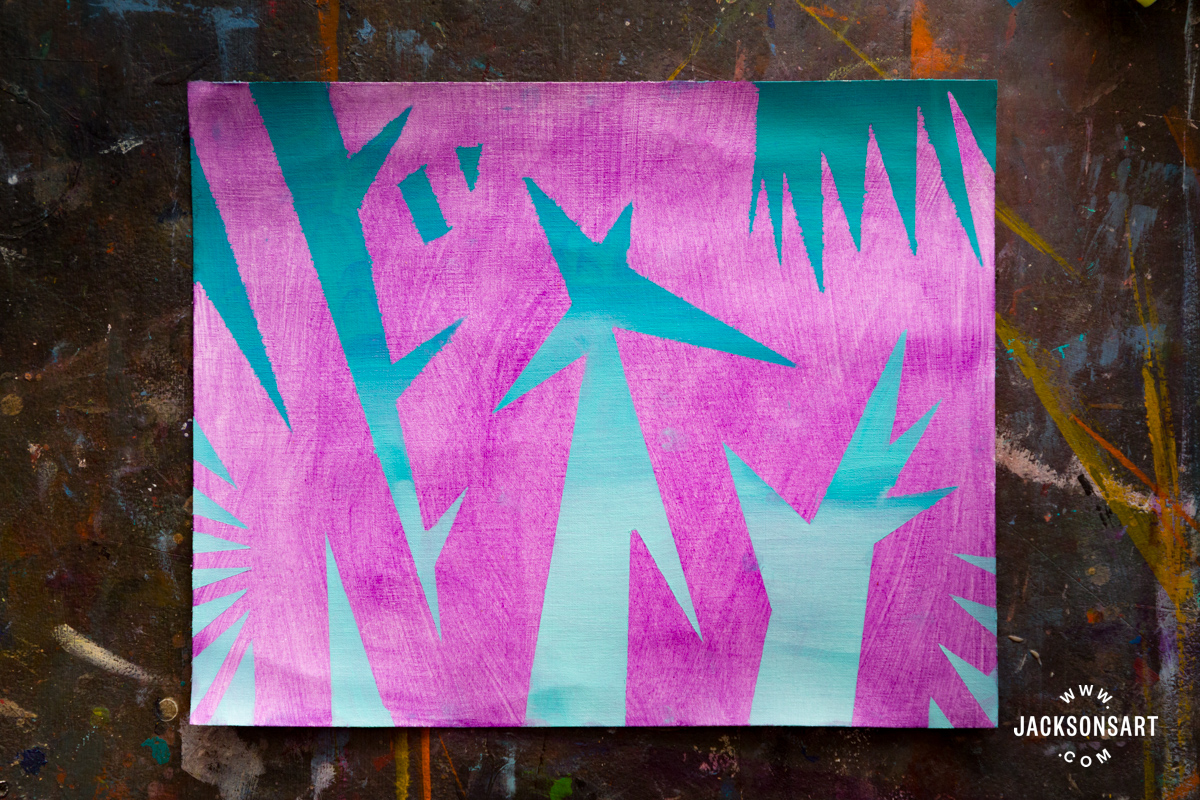
For my first examples, I wanted to demonstrate the resist technique using tape with oil paint, which would also work well with acrylic. For the first example, I used Jackson’s Professional Oil Paint on a sheet from a Jackson’s Oil Paper Block with a purple acrylic ground, with Handover Low Tack Lining Tape. Then, for the second example, I cut out more specific shapes using Handover Professional Masking Tape with a craft knife.
Creating Straight Edges with Tape
I applied my tape to the surface, marking out the areas that I wanted to create sharp shapes with. I cut some of the pieces of tape to make deliberate angles.
Next, I painted on top of the surface, creating a gradient with Cobalt Teal and Warm White.
To finish, I left the paint to partially dry down, before peeling it off carefully to reveal the ground below.
Tips: If the tape is hard to remove with your fingers, or you want to remove it before the oil paint is tacky, you can try to pick it up with the edge of a knife or tweezers. Generally, the wetter the paint, the more errors you risk happening.
If there are any errors on your intended sharp edge, you can try to carefully pick them up with a small palette knife, and then try to shift the remaining paint with a small clean brush dipped in medium. Once you have shifted it a bit, you can try to carefully wipe it from the affected area with a rag.
If you find that your tape is actually too strong, to the point where it is lifting some of your underpainting off when you peel it back, you can weaken the glue by not sticking it on the surface straight from the roll. First, stick the tape to a clean surface, peel it off, and repeat as many times as is necessary to remove some of the glue. It can be wise to test how sticky your tape is with a small sample area of painting before you put it straight on your work.
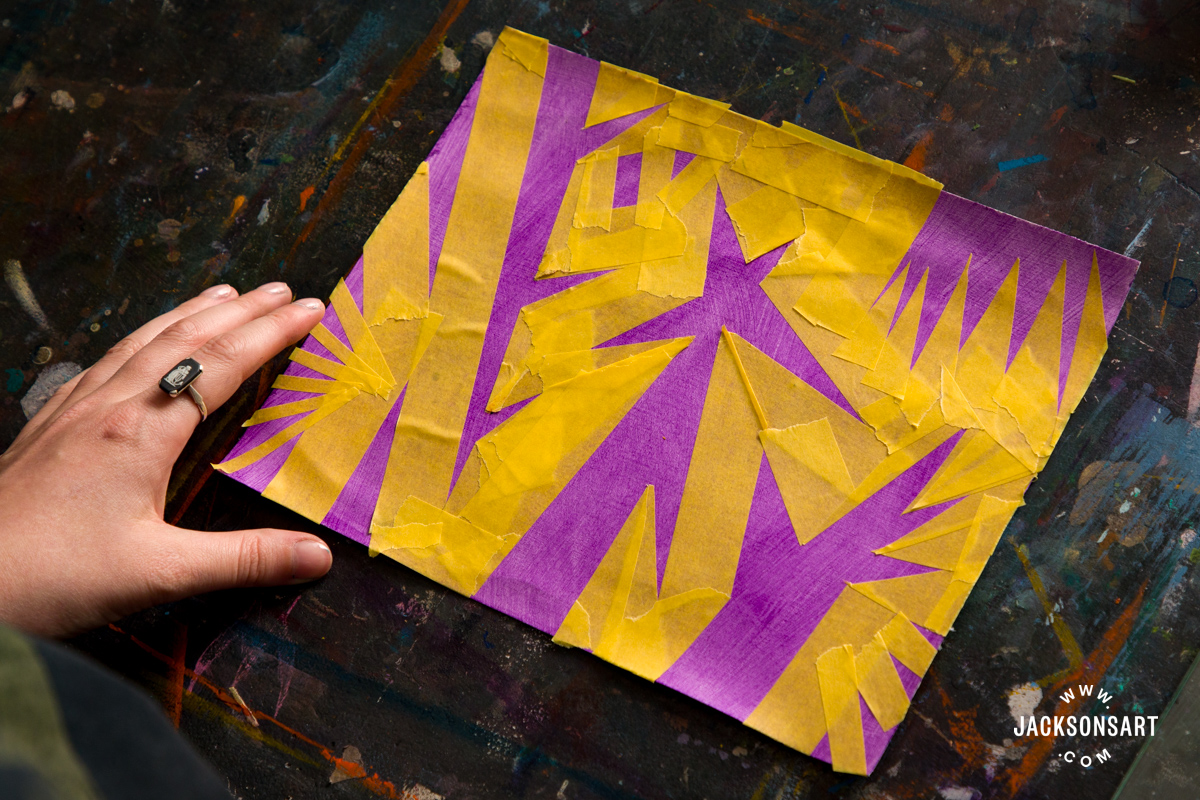
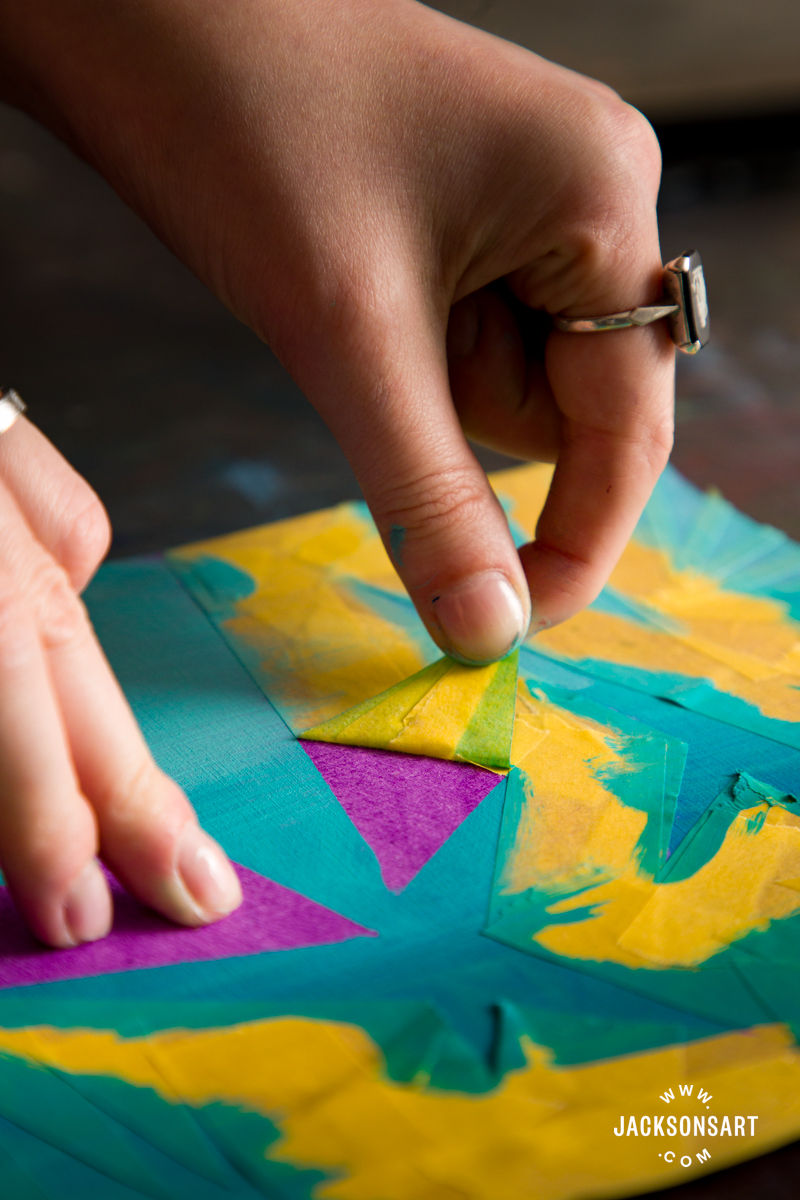
Cutting the Design out of Tape
To begin, I prepared a ground where I splattered some blue acrylic paint onto my Jackson’s Oil Paper Block sheet and allowed it to dry.
Next, I stuck down my tape in deliberate sections, and then cut the shape of my pots out carefully with a craft knife directly onto the surface. By applying a medium amount of pressure you are able to cut the tape without also cutting the paper below. As I went, I peeled the unwanted sections of tape away to reveal my composition.
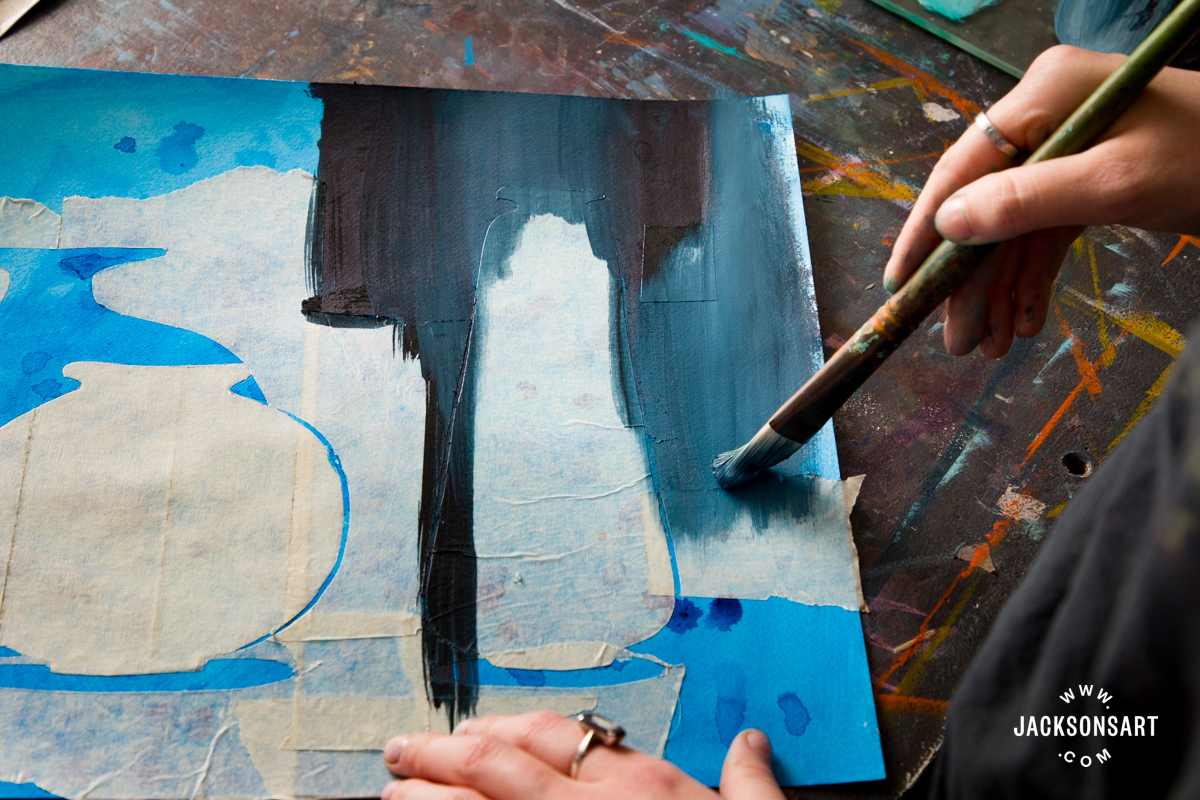
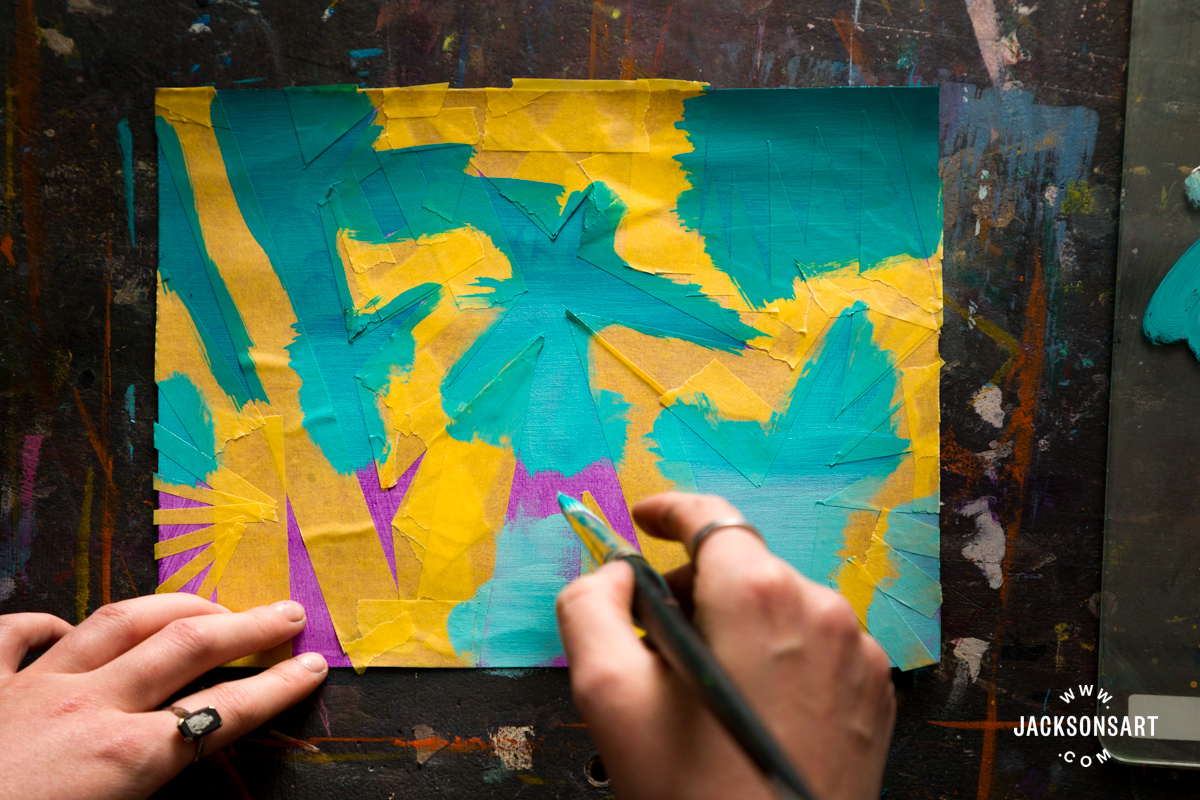
Then I painted over the entire surface using a mixture of Indigo and Warm White.
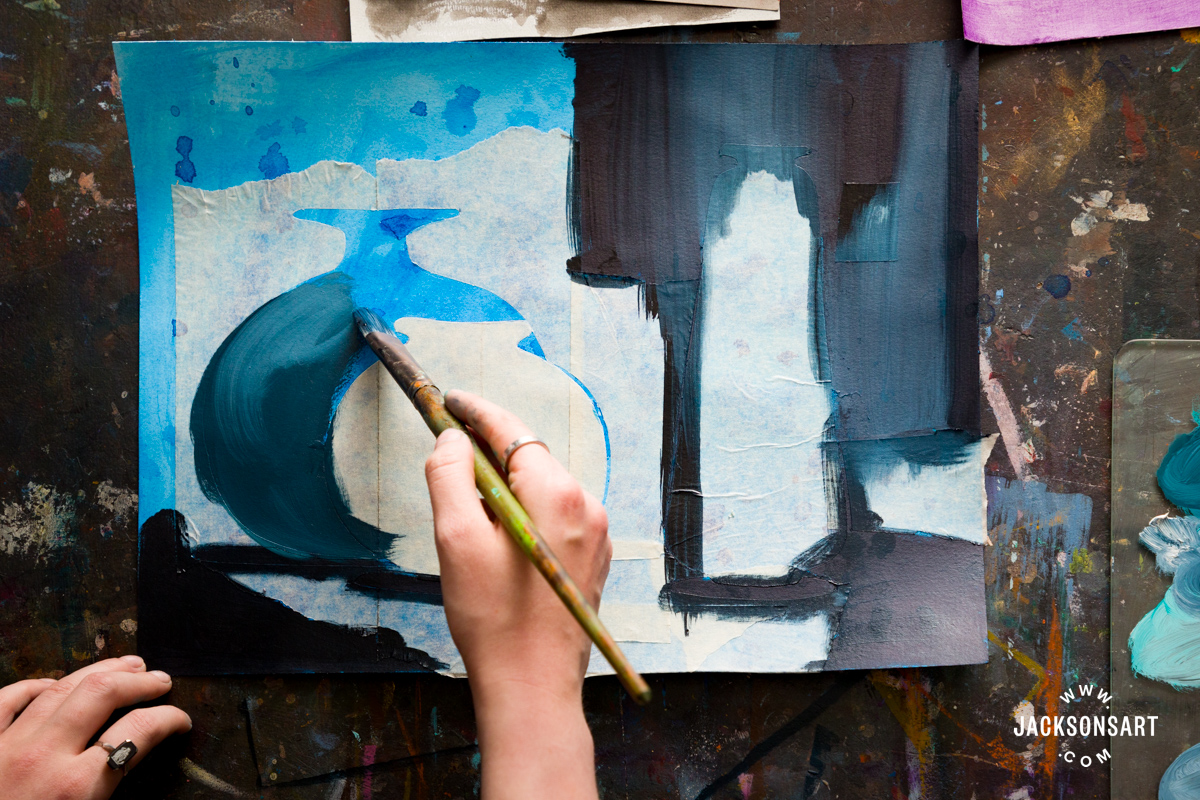
To finish, I peeled off the tape, in some areas using a small knife edge to help me lift the corners.

Tips: If you’re using acrylic paint and want to make the edges of your tape especially crisp when using the resist technique, you can seal the tape with clear acrylic over the edge of the tape before painting around it. The technique is described here in the article, Sealing Your Masking Tape for Better Hard Edges in Acrylic Painting.
If your paint is very diluted and fluid, it’s more likely to seep under the edge of the tape and give you problems. It’s best to work with paint straight from the tube to get a crisp edge.

Demonstration of the Resist Technique for Watercolours
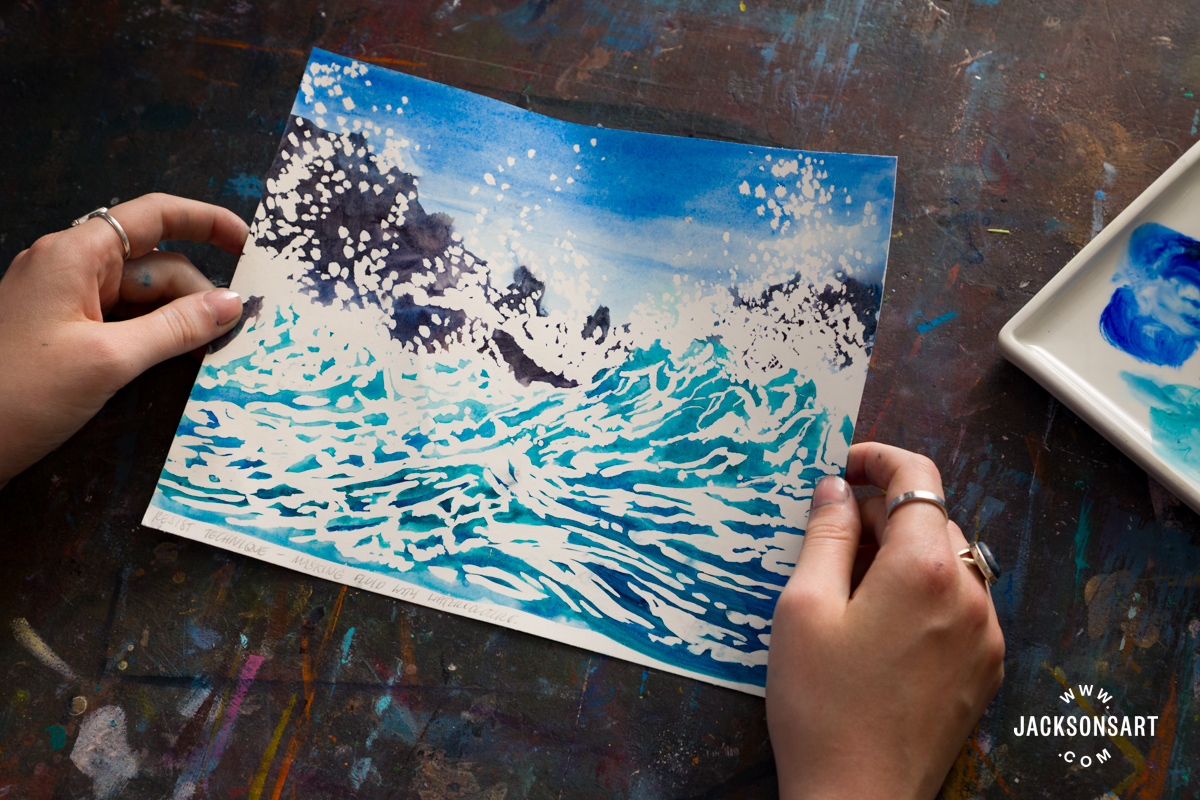
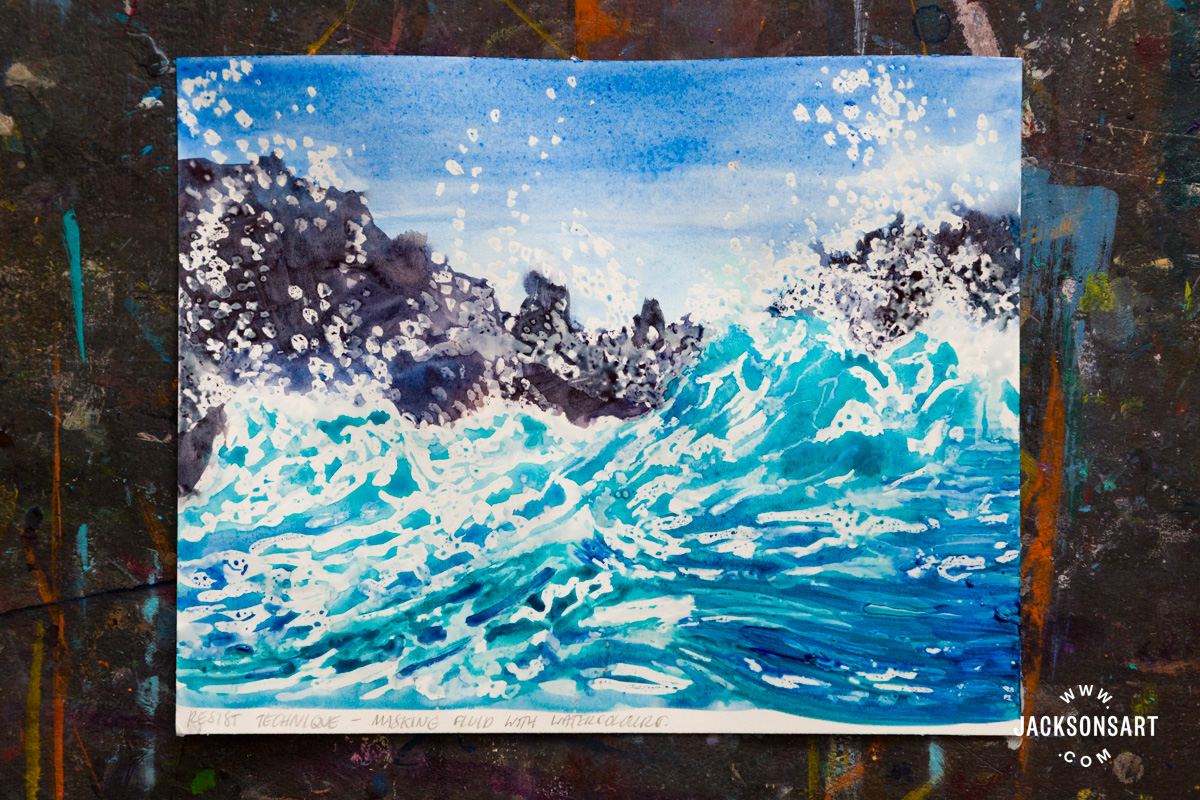
To demonstrate the resist technique with watercolours, I used Jackson’s Masking Fluid in blue, with Jackson’s Artist Watercolour Paints, on a Jackson’s Bockingford Watercolour Pad. For my imagery, I painted stormy waves crashing on some rocks.

I applied my fluid medium to all of the areas I wanted to retain as white highlights, picking out the crests of the waves, sea spray, and highlights in its movement. I used it to ‘draw’ the entire image and didn’t do a preparatory drawing first.
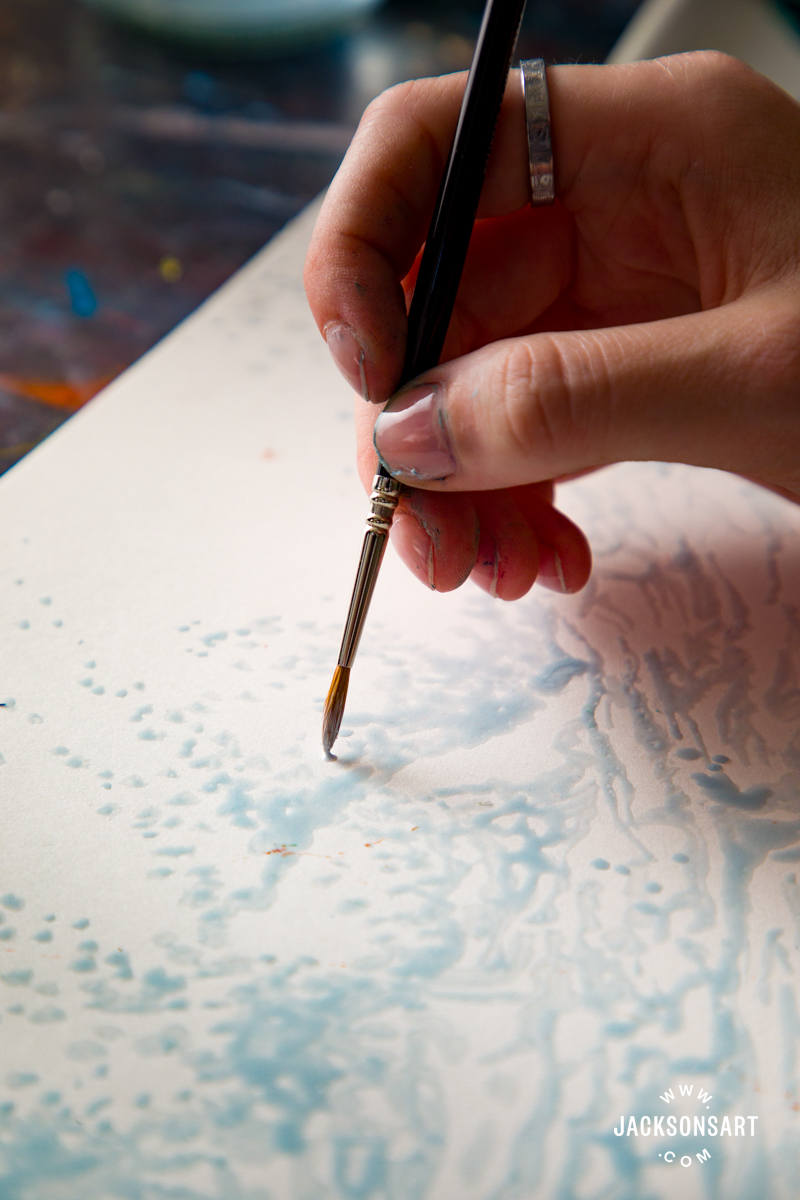
Once the medium was dry, I began painting over the whole sheet of paper using French Ultramarine and Viridian. As you can see, it allowed me to make broad brushstrokes over some very small highlights that wouldn’t be possible by any other means.

Lastly, I removed the fluid medium by rubbing over it with an eraser after the watercolour paint was completely dry.
Tips: If you want to apply the masking fluid to create a more spontaneous or random effect, or to cover a larger area, like to pick out hundreds of tiny stars, you can splatter the fluid medium onto the paper by flicking it from a brush.
Fluid medium may rub off your page if you apply too much pressure to it with your hand or the brush, so be careful to use a lighter touch and minimise rubbing over the surface as you work.
You can use a masking fluid applicator to apply the product if you’d like to create very fine details. The applicator tip is very thin, so it allows you to stipple tiny dots or draw precise linework.
Demonstrations of the Resist Technique with Oil Pastels and Mixed Media
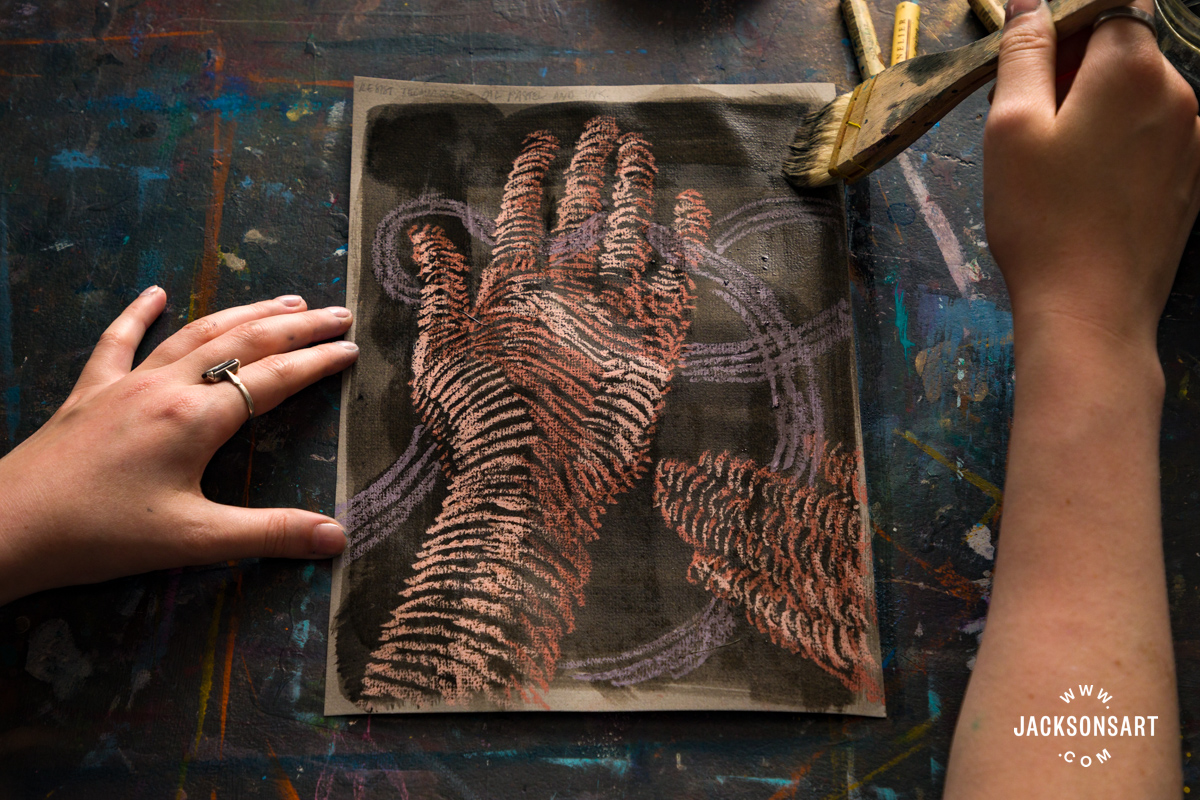
Finally, I wanted to demonstrate the resist technique using the wax resist method that Henry Moore perfected, using oil pastels and mixed media. For these examples, I worked with Sennelier Oil Pastels on Winsor and Newton Pastel Paper, then washed black ink on top.
I made a simple oil pastel line drawing of my hand, making sure to leave gaps between the lines because I wanted the ink to flood them later.
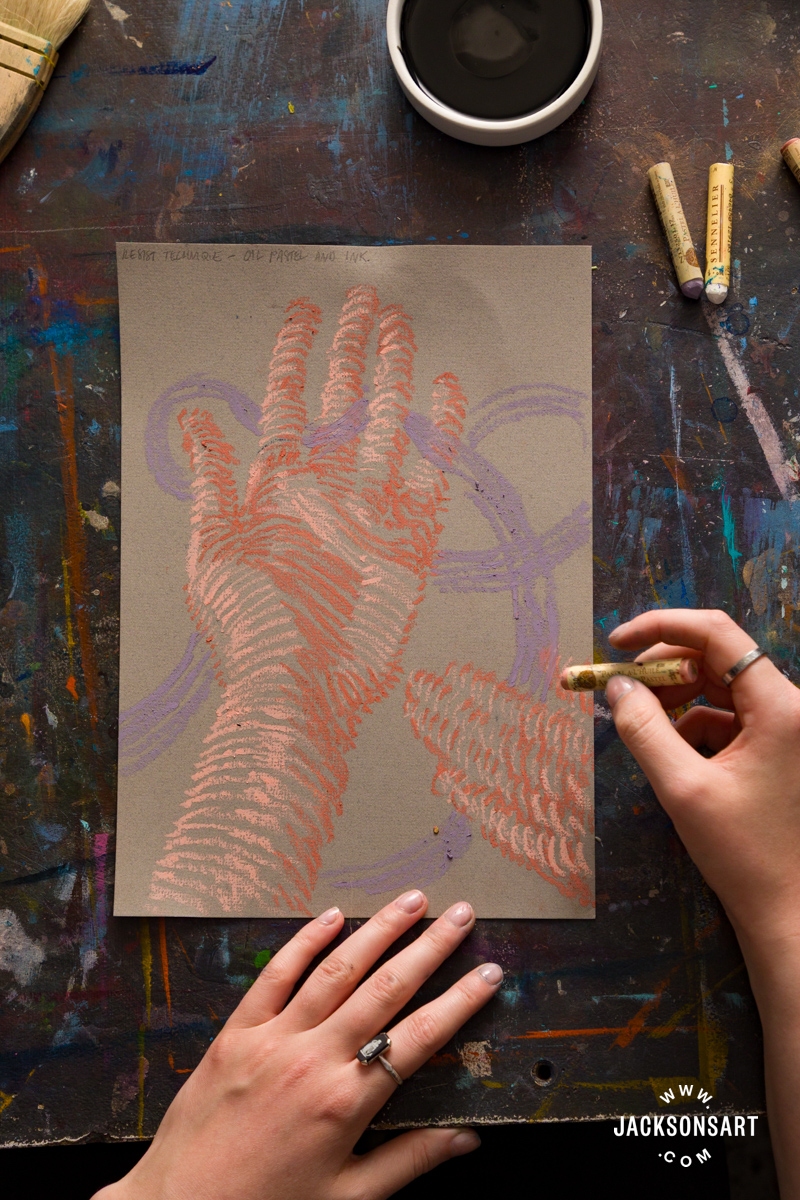
Next, I prepared some drawing ink by diluting it with a splash of water, so it was a medium grey colour, not a harsh black.
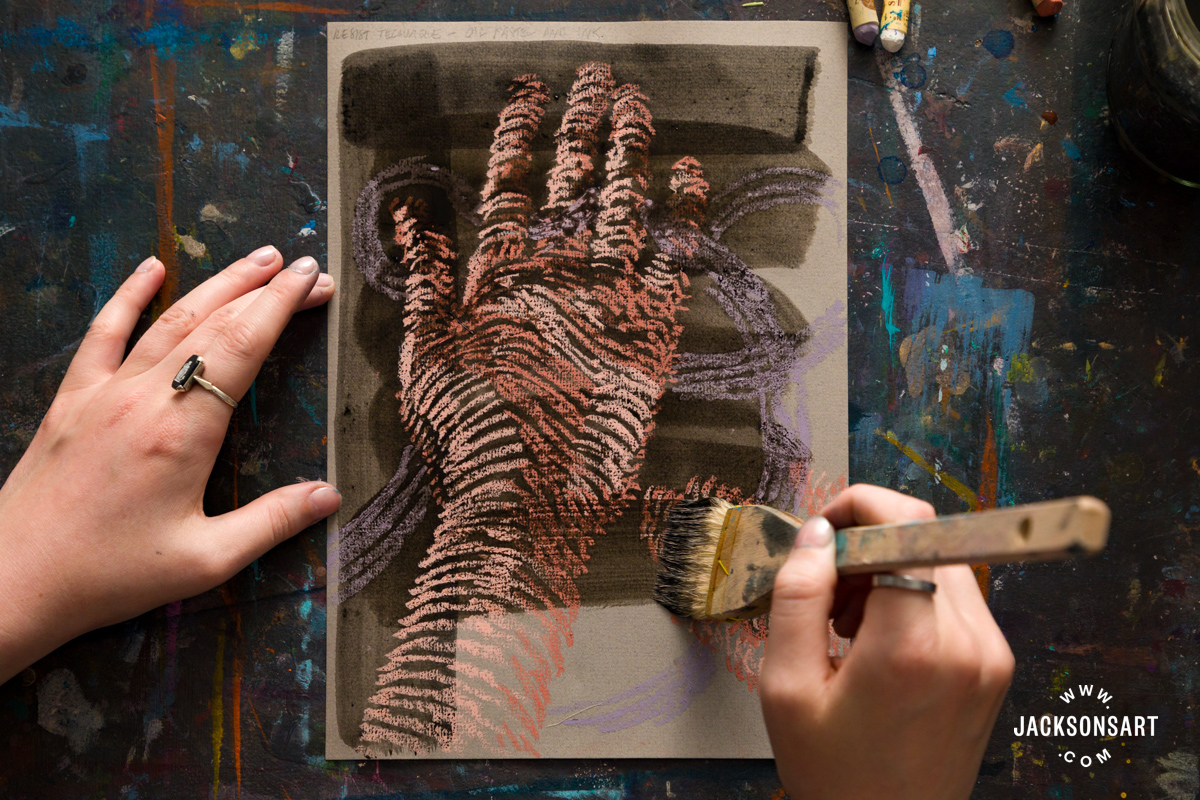
Finally, I washed it over the entire oil pastel drawing using a broad brush. As you can see, the oil pastel resisted the watery ink.
Tips: At this stage of the drawing, with oil pastel and an ink wash, you’re free to work back into the drawing with oil pastel again or other media to build up a more complex mixed media artwork.
This technique would also work with watercolours or other colours of ink, so you can enjoy experimenting with colour combinations that will complement your oil pastels.
Further Reading
Sealing Your Masking Tape for Better Hard Edges in Acrylic Painting
Introduction to Aquatint Printmaking
Comparing Three Brands of Oil Pastels
Shop Art Materials on jacksonsart.com

The post Resist Techniques for Painting, Drawing, and Printmaking appeared first on Jackson's Art Blog.
Trending Products