Dabbing is an incredibly versatile painting technique that most artists utilise, from applying tiny areas of rough texture to decisively dabbing entire paintings. In this article, I define the technique by looking at key examples from art history – from the Dutch Golden Age, the Japanese mid-Edo period, to Les Nabis in Paris. Then I demonstrate how to apply dabbing to your own works, in oil, acrylic, ink and watercolour paints. Articles in the Techniques Series define the meaning and context of art making processes and give practical tutorials on how to work with them.

The Dabbing Technique for Painting
Definition: Dabbing refers to the application of paint or ink to a surface using a repetitive vertical hand motion. The media is bounced, pressed or touched onto the surface without linear movement or hand gesture, giving a diffused effect. Dabbing may be achieved with brushes, rags, or palette knives.
What is the Effect of Dabbing?
Paintings made with dabbing may have a diffused quality, where the artist has intentionally foregone linear or painted mark-making. It’s perfect for applying the texture of naturalistic elements like clouds and foliage, building up patterns, and for realising subtle tonal effects like soft shadows and lighting. The texture of dabbing varies depending on the implement used to apply it: for instance, a hog brush may dab a rough, scattered mark, and a round sable brush may dab clean ovals of colour. In this sense, it’s a versatile technique, since using different implements to apply dabbing across the same painting can create a variety of visual effects. Layering up areas of dabbing will also alter the effect of the technique, making the painted marks bolder. This would allow the paintwork to appear closer to a rough brick wall than a wisp of smoke.
The History of Dabbing
Dabbing has been used prolifically throughout painting history, since it’s such a versatile and intuitive technique. Most paintings have some areas of dabbing, perhaps even added subconsciously by the painter. Given the wide range of examples, I’ve chosen works where dabbing is key to the finish of the painting.
Often, dabbing will be employed in a painting where the texture of an object or subject would be best emulated through the technique. In Moses ter Borch Holding a Kolf Stick, by Gesina ter Borch, she painted her younger brother holding a kolf stick, which was a game that inspired golf as we know it today. Gesina ter Borch had an artist father who trained her older brother to be a professional artist. Although she did not receive the same attention, she still made watercolours and drawings in her own right. This painting is one of only two oil paintings attributed to her, and both tenderly depict her brother Moses. The softness of the sheepskin he’s wearing has been achieved through dabbing with a small brush, keeping him warm as he plays his game on the ice.

Moses ter Borch Holding a Kolf Stick, c. 1655
Gesina ter Borch
Oil on panel, 39.37 x 26.67 cm | 15.5 x 10.5 in
National Gallery of Art
Itō Jakuchū is perhaps the most famed mid-Edo period artist, and his 30 scroll work The Realm of Living Beings is considered a national treasure in Japan. His works often depicted birds, and he was celebrated for the experimental advances he made in Japanese painting history. His work, White Plum Blossoms and Moon, depicts a flowering blossom tree, where the white flower buds and texture of the branches have been dabbed on in ink. From a distance, the work moves in a flurry like snowfall, with a visual path guided by the branches. Since some of the dabbed white buds are more opaque than others, it gives the impression that the flowers have form and that they are tilted in different directions. Meticulously rendering each flower to give this same effect would take an incredibly long time, so in this example, dabbing was the most practical choice.

White Plum Blossoms and Moon, 1755
Itō Jakuchū
Hanging scroll; ink and colour on silk, 140.7 x 79.4 cm | 55.3 x 31.2 in
The Metropolitan Museum of Art
Édouard Vuillard’s paintings contain constellations of dabbing, which make his works instantly recognisable by their highly patterned surfaces. As a member of Les Nabis, he worked in rejection of the rules of classical painting, without linear perspective, and modelling of the human form. They also argued against the Impressionists’ intention to emulate the natural world, which they felt was an unartistic approach to painting. Instead, they elevated ‘decoration’ as the purpose of their works, attempting to blur the line between craft and fine art.
Vuillard drew from visual influences such as Monet’s Water Lilies series, which are full of dabbing, to the bold colours and patterns in Japanese prints. In his painting Woman in a Striped Dress, we see two women in an interior, with one of them placing a vase of flowers. The purpose of his works is to evoke emotion rather than to record narrative, and this one conveys a sense of warm intimacy. The harmony of the restricted palette, paired with the dabbed surface using different brush sizes, gives the painting a breathing, shifting effect. Even though he painted stripes, he intentionally avoided applying them in linear strokes, demonstrating his aesthetic commitment to the dabbed surface.

Woman in a Striped Dress, 1895
Edouard Vuillard
Oil on canvas, 65.7 x 58.7 cm | 25.8 x 23.2 in
National Gallery of Art
Demonstrations of the Dabbing Technique
Dabbing with Different Brush Types and Sizes
For my first example, I created a sheet of dabbed brushmarks as a reference guide of the kind of textures dabbing can create in paintings in Ultramarine Blue acrylic paint. My brushes are widely varied in type and size, giving me a broad range of effects, from fluffy starbursts to dappled lines. It can be helpful to create a sheet like this of your own, so you can see which brushes produce the most compelling effects, before you start applying the technique directly to your work.

Dabbing with Watercolour and Ink
The main difference with dabbing with watercolours and ink, as opposed to oil and acrylic paint, is that they’re more challenging to layer up, and the marks will vary more depending on the water content of the media. For my watercolour test sheet, I added three examples of dabbing with different brushes, adding more water to each as I moved down the page. As you can see, the higher the water content, the more the bristle marks disappear, making the dabbed marks into dispersed pools of pigments.
Since watercolours appear differently when applied wet-on-wet versus wet-on-dry, I wanted to show how the same dabbed marks would look using each approach. For these examples, I used Jackson’s Artist Watercolours in Cerulean Blue, Permanent Magenta, Blue Violet, and Raw Sienna. On the top side, the wet-on-dry example shows no bleeding, and the dabbed marks dried exactly where I placed them. As you can see in the wet-on-wet example below, the same dabbed marks dispersed and mingled together as I placed them onto the surface, giving a softer, more organic finish.

Finally, on the same sheet, I painted an example of dabbing with watercolours in various layers, using the same palette as the previous example. As you can see, the denser areas become slightly muddier and harder to discern, as the transparency of the paint allows the previous marks to show through. The area in the middle that I left in a lighter single layer appears more vibrant and clear.

Next, I made a test sheet using the dabbing technique with Daler-Rowney FW Artists’ Ink in Black. I started by repeating the same example of increasing the water content of the dabbed marks as I moved down the page. The effect is pretty similar to my watercolour example, although this time the tonal difference is perhaps more noticeable than the mark-making.
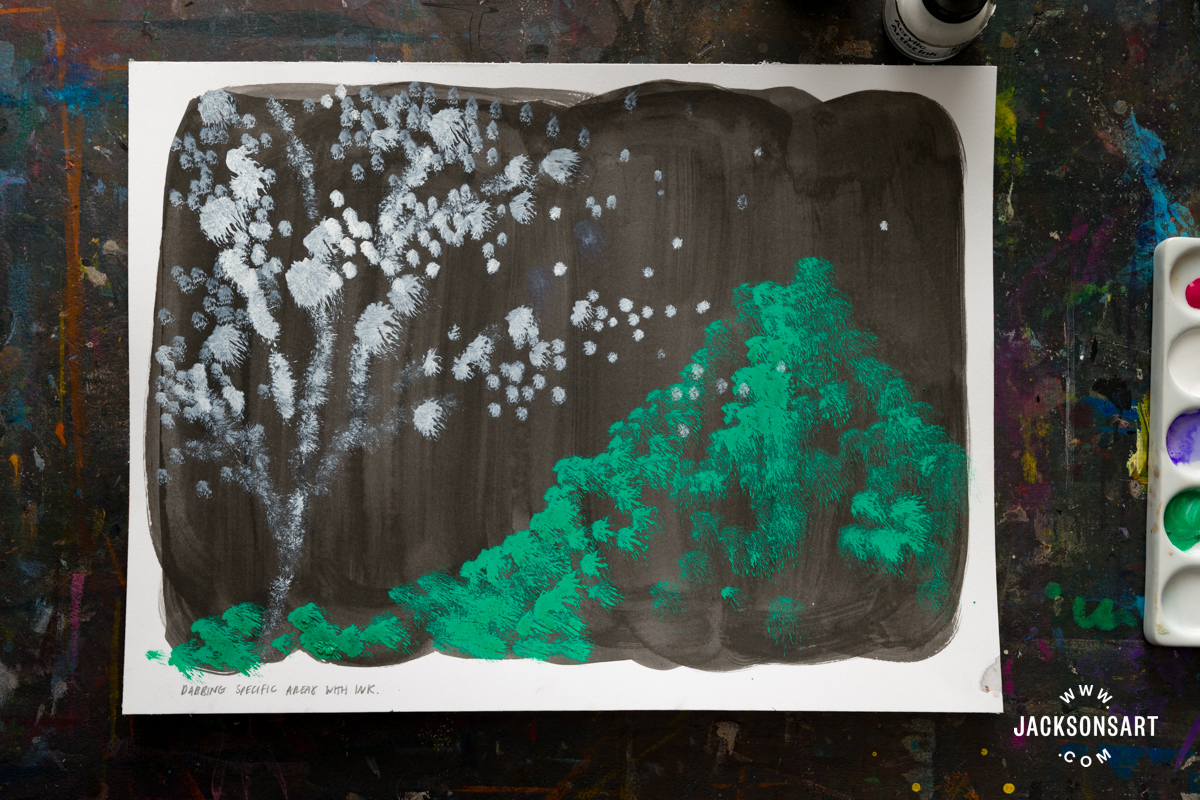
If you’re working monochromatically with ink, it’s best to work methodically through the tonal range of the image, from the lightest to darkest tones. This allows you to layer up compelling depth and detail as you progress, some of which will still be visible in the final image. I built up an image of a tree using the dabbing technique, from the lightest to darkest tones. As you can see, this allowed me to add some smaller, scratchier dabbed marks to the final dark layer, giving the leaves, trunk and grass necessary texture.

Finally, I wanted to show how dry brushing the dabbed marks with ink will also vary their effect, by dabbing downwards with three different brushes, having only dipped the brush in the ink once. As you can see, the relative subtlety and lighter tone of the dry-brushed dabbed marks at the bottom take on a totally different character to the bold ones at the top. To simulate this effect you could also dip your brush in ink and rub it into a rag until you reach the desired dryness for wispy marks.
Dabbing the Texture of an Object or Subject with Paint
Like we see in Moses ter Borch Holding a Kolf Stick, dabbing is often employed to emulate the texture of a physical object or subject. For my example painting, I worked from an image of a lady walking down the street with a fur coat on. I wanted to emulate the texture of her coat with the dabbing technique, which would appear in stark visual contrast to the flat planes of the street around her. My underpainting was painted with Jackson’s Professional Acrylic Paint, in Yellow Ochre, Burnt Umber, Titanium White, and Ultramarine Blue.

I dabbed the texture of the coat on using a couple of brushes to vary my marks. I found that the fan brush produced the distinctive fluffy texture that I was looking for. I varied the tone of the paint I applied to give the illusion of the movement of the fur, picking up highlights around the edges to finish.

Dabbing Across the Entire Picture Plane with Paint
After looking to Vuillard for inspiration for dabbing, I wanted to make a painting that utilised dabbing across the entire surface. I started my painting by applying a ground to my surface, using a mixture of Cadmium Red Deep and French Ultramarine Blue, to create a deeper wine red, which emulates some of Vuillard’s paintings.
Next, I began dabbing my oil paints onto the surface, using a restricted palette of Jackson’s Professional Oil Paints in Indigo, Warm White, Yellow Ochre and Scarlet Lake. I worked methodically, trying not to overlap the colours more than twice, at the risk of them becoming muddy or too slick to adhere properly. Applying dabbing all over the surface has a diffused effect, which breaks the boundaries between separate planes and objects, making the entire work feel unified.

Dabbing with Rags and Palette Knives
Dabbing doesn’t solely need to be achieved using brushes, since palette knives, rags, or even unconventional materials could be ideal for your work. For this example, I’ve added dabbing to a test sheet using three different kinds of RGM Palette Knives with Phthalo Turquoise. From left to right, they had: a tapered with a small rounded tip, an angled straight edge, and a wedge-shaped tip. As you can see, dabbing with palette knives deposits a thicker layer of paint that may rest in a peak because of the vertical dabbing action. It’s ideal for those who enjoy an impasto finish to their works.

Then, I tested dabbing the same oil colour with a rag, first dabbing a small area the size of my fingertip inside the cloth, and then rolling the cloth into a ball to get a larger dabbed shape. The weave of the rag I used is visible in the print it produced, so that’s something to keep in mind when aiming for your desired dabbed texture too.

Further Reading
Understanding Brush Shape Names, Hair and Applications
Pointillist Techniques for Painting and Drawing
Impressionist Painting Techniques
Shop Art Materials on jacksonsart.com

The post The Dabbing Technique for Painting appeared first on Jackson's Art Blog.
Trending Products